Showing posts with label detergent. Show all posts

Wednesday, March 2, 2016

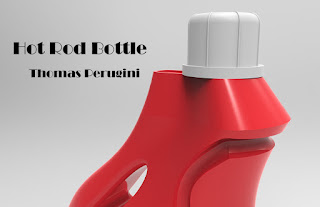
Thomas Perugini: Week 4 Detergent Bottle

My main inspiration for the bottle design was that of hot rod cars. The curves and edges were heavily incorporated into the overall look, as well as the colors. The cap was loosely based off of a construction worker's hard hat.


For the main bottle shape, I did a 2 rail sweep between two curves. I then offset the curves to make a nice indent on the top and bottom. The handle was made by using a boolean subtraction from an extruded curve, and then filleting the edges to make it round. The ribbon was made by a 1 rail sweep of a circle. The rail was a curve projected onto the bottle model. The cap is a filleted cylinder with a few mirrors of a swept circle, and another cylinder at the bottom.


As with most other detergent bottles, mine is made of a hard, shiny plastic. The cap is a grey hard plastic, and the inner top of the bottle is a rough, clear plastic.


Monday, February 29, 2016

Travis Fowler: Jug

Concept:

This project was thoroughly uninspired. I liked the general design of the tutorial bottle and when I went to my laundry room to look for inspiration, I realized that the detergent bottle I had come up with after following the tutorial was still more imaginative than the jugs holding my own detergent. 

Techniques:

The fundamental surface creation tool introduced in this tutorial was the rail command. After my encounter with the Boolean problems in the flashlight assignment, I was weary of each new command and how it might interact with the curves of my model. Rhino commands are fairly intuitive and can usually be sorted out just by reading the prompt in the command window. The offset surface tool was the only technique that gave me trouble here but the rhino help window is VERY helpful.


Materials:

I like blue, it is my favorite color. I decided to use a variety of blue plastics for the jug. I was afraid that the unblemished design would suffer from its simplicity but it is truly amazing what a single semi-transparent section of material will do for the complexity of a design.


Monday, February 15, 2016

Victoria Mayfield: Detergent Bottle


Concept: When I first started modeling the detergent bottle I didn't know how I was going to make it different from the rest. Once I started laying down curves I decided that I would use bold and interesting lines in order to give my model some extra pizzazz. The bold lines highlight my simple bottle design. When I was looking for references online most bottles were simple and had nothing extra. So I tried to build on the idea of simplicity and make it more daring. 

Modeling: The tools that I used for my detergent bottle were curves to lay out the main shape, and the sweep 2 tool to create the body. I also used curves, the split and the delete tool in order to create the main bold line down the side of the bottle. As well as the fillet edge tool to create a smooth design. I wanted to stick with the idea of interesting curves by giving the handle finger grips. I created this effect with a simple curve, the extrude curve tool, and the boolean difference tool. I used the helix tool, and boolean difference tool in order to create the spout and the cap. 


Materials: For the materials I did want to stay true to what a detergent bottle would be made out of. I wanted to further my bold design by using colors that were just as vibrant. I went with a shiny purple plastic for the main body, and highlighted with a streak of shiny yellow plastic. I chose these colors as they are complimentary and were pleasing to the eye. I deviated with the main color theme a bit with the spout, making that a shiny black plastic material. Overall, I am pleased with the way that the detergent bottle turned out with the modeling techniques and materials I chose.