Showing posts with label modeling. Show all posts

Wednesday, October 11, 2017

Elias Perez - 3D Printing

Concept:
    The focus I was trying to make with this model was to create a small figure to lighten up my desk at home and I recently found a love for adventure based video games and decided to follow the classic trope of the hero who pulls the sword from the legendary stone. I was inspired by many different swords from franchises that I adore such as the Legend of Zelda's Master Sword, Zabuza's Executioner Blade from Naruto, as well as a traditional British Sword. I used the Master Sword as reference for the hilt using the spiraling shapes that stack on top of each other for the main design, I was focused on creating a dull like blade to give a sense of use and heavy weight alongside the brutal idea of a large slab of metal on a handle coming for you.

Master Sword Hilt (Reference)

Executioner's Blade(Reference)

British Sword(Reference)

Techniques:

    The techniques used for the creation of the model included the use of the Snapping Tools to the grid as well as the center of objects, Rotating, BooleanUnion, Linear Dimensions, Analyzing of Edges, and Scale commands. When building the model I would make sure to snap the beginning shape to the grid so as to make an even circle for the cylinder's base as I knew I would be making multiple and different sized shapes and stacking them on one another and then combining them with the use of BooleanUnion to create the hilt. The use layers were meant not to separate the objects but rather to be used to hide them when I needed to use the center snap tool to create an evenly stacked object and truly choose the center of the object that I needed. Rotating played a big part as I began working with the sword upwards and then rotated it 180 degrees and then angled it to my liking so that I could work on the hilt, and the handle of the sword as well as get the ominous angle of the sword being embedded in stone. The stone was made to serve as my platform and base for the object as well so that it will stand up on its own on my desk. The Dimensions of the object are about an inch off of the requirements but I found that it was a necessary amount considering the sword is just generally long and the base high, I scaled it down from it's original size to meet these requirements. 

Ghosted Image of layers and the Final Grouping

Showing the Analysis of the Edges

Measurements: 
    The required measurements for this object were meant to be 4 in. width, 5 in. length, and 6 in. height however I exceeded these each by 1 in. as I saw it necessary to get the length of the executioner blade as long as it could be as that is part of the menacing factor. The hilt adds length as well as the base so I treated each as separate objects. I edited the dimensions of the world as it began in millimeters and then used the Linear Dimension from the Dimensions drop down box to show the measurements on the grid plane. 
Measurements of Model(Different Color Used for Emphasis of Text)
Materials:
    The materials I hope to use are just a nice wood that can be painted as I wanted to paint the model by hand as well as be able to engrave into it physically with a human touch rather than have the printer do all the work. I plan on carving an insignia into the rock so as to create a sense of a kingdom elsewhere or show importance of the blade. I am going to carve into the handle of the blade so that it is not entirely just a rounded cylinder so that I may later wrap a ribbon into the crevices of the cut to create a more realistic feel of a grip to the blade. 
    

Valeria Cavazos - 3D Printing

Concept:
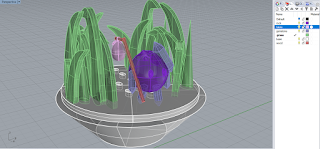
    My concept was based on a character I designed for a children's book as a Graphic Design project. This rock is one out of five and as the leader of the group, I chose to make a scene depicting him walking through the some grass with his mini hobo bag. 

Techniques:
    I first started with the base and the tried different styles before choosing the one in the picture in order to keep it simple yet show that it is a base. It was made with a truncated cone and a extruded circle to simulate dirt. The grass was drawn with the Curve tool to get two different styles, extruded both, and placed around the rock, along with a thin triangle. The actual was was created using a circle and adding small triangular pieces to make the rock look less smooth and more ragged. The gems on the rock were made with a hexagon from the Shape Tool and tracing the shape with a line tool in order to create a triangle for the points of the gems. After making one, I just copied, pasted, and scaled four more for the limbs. 
ghosted image
ghosted image with Keyshot layering assignment

measurements

Material:
    The bases material was made to look like wood and the base that simulates dirt was made with a leather material. The rock was made using a granite rock but I changed the colors in order to get a grainy appearance but not get lost in the material and the gem was a yellow gem. The grass was a result of playing with a miscellaneous material, Matte White, in order to get an organic look but not cartoonish or too fake. Metal was also too shiny to get the organic look of the grass but the front blade of grass with holes is actual metal colored green with properties such as the roughness and the Material Type. 


Final Product:


Monday, February 15, 2016

Victoria Mayfield: Detergent Bottle


Concept: When I first started modeling the detergent bottle I didn't know how I was going to make it different from the rest. Once I started laying down curves I decided that I would use bold and interesting lines in order to give my model some extra pizzazz. The bold lines highlight my simple bottle design. When I was looking for references online most bottles were simple and had nothing extra. So I tried to build on the idea of simplicity and make it more daring. 

Modeling: The tools that I used for my detergent bottle were curves to lay out the main shape, and the sweep 2 tool to create the body. I also used curves, the split and the delete tool in order to create the main bold line down the side of the bottle. As well as the fillet edge tool to create a smooth design. I wanted to stick with the idea of interesting curves by giving the handle finger grips. I created this effect with a simple curve, the extrude curve tool, and the boolean difference tool. I used the helix tool, and boolean difference tool in order to create the spout and the cap. 


Materials: For the materials I did want to stay true to what a detergent bottle would be made out of. I wanted to further my bold design by using colors that were just as vibrant. I went with a shiny purple plastic for the main body, and highlighted with a streak of shiny yellow plastic. I chose these colors as they are complimentary and were pleasing to the eye. I deviated with the main color theme a bit with the spout, making that a shiny black plastic material. Overall, I am pleased with the way that the detergent bottle turned out with the modeling techniques and materials I chose. 

Sunday, February 7, 2016

Victoria Mayfield: Mouse


Concept: My concept for this mouse was a simplistic and sleek mouse. I researched different types of mouses and didn't find any I really liked. I ended up trying to recreate a mouse that I had when I got my first computer in high school. I no longer have it for reference material, but I feel like I successfully modeled it from memory. 

Modeling: The main new tool that I used for this model was the fillet tool. It allowed me to have curved, finished edges around the base of the mouse, the buttons, and the scroll wheel. I also made use of the curve tool, arc tool and control points. The sweep2 tool allowed me to create the body of my mouse simply by using a few curves. Finally, I created the buttons and scroll wheel using the difference tool, and then filleting the edges, as I mentioned before. 


Materials: I chose the materials I did because I wanted the mouse to closely resemble a mouse that I had when I was younger. The body was a shiny purple plastic, so that's why I chose that. The buttons were a more matte and textured plastic, so with the materials available, I felt that matched best for the buttons. The scroll wheel was also a more rubbery texture, but it was more shiny than matte, so I found one that had more of a sheen to it. The cord is simply a black rubber material since that perfectly matched the mouse that I had.