Showing posts with label detergentbottle. Show all posts

Wednesday, March 2, 2016

Thomas Perugini: Week 4 Detergent Bottle

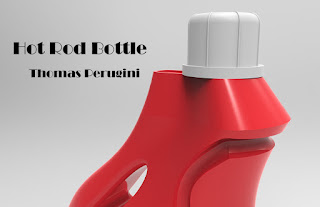
My main inspiration for the bottle design was that of hot rod cars. The curves and edges were heavily incorporated into the overall look, as well as the colors. The cap was loosely based off of a construction worker's hard hat.


For the main bottle shape, I did a 2 rail sweep between two curves. I then offset the curves to make a nice indent on the top and bottom. The handle was made by using a boolean subtraction from an extruded curve, and then filleting the edges to make it round. The ribbon was made by a 1 rail sweep of a circle. The rail was a curve projected onto the bottle model. The cap is a filleted cylinder with a few mirrors of a swept circle, and another cylinder at the bottom.


As with most other detergent bottles, mine is made of a hard, shiny plastic. The cap is a grey hard plastic, and the inner top of the bottle is a rough, clear plastic.


Sunday, February 21, 2016

Tara Intyrath: Week 4 - Detergent Bottle

Concept: For this model I used the base of the tutorial to make everything not straying too far from it. I did want to try making a label or tape around it and that was a lot harder than I thought it would be but I managed to something. I watched the Deadpool movie recently so that's why I chose to make a "duct tape" for a label as there is a joke about covering Ajax labels with the name "Francis."
Technique: The techniques used to make this model used a lot of curve and solid tools. To make the main surface of the body I made a base curve for the bottom and two cross section curves going up before and used a sweep. I used more curves to split the surface into several surfaces and then closed the body again using sweeps to make inner surfaces. I learned that you have to join some surfaces together before using "create solid" as the program can't use some surfaces when they are separated. It made me frustrated for a while before I figured this out. I then later used techniques shown in "how to create a thread screw" videos on elearning.
Materials: Choosing materials wasn't very hard. I just need a plastic body and plastic cap. I decided to go with blue for the body as Ajax detergent is usually in a blue bottle. I chose a clear plastic for the cap so you can see the threading in the model. For the tape, I made my own duct tape texture and added it in there with the name Francis on it. I would of made an Ajax label to go underneath the duct tape to make the joke more thorough but that would of took more time in photoshop which I am not too familiar with. 

Monday, February 15, 2016

Megan Heard: Week 4 Detergent Bottle


Concept: I wanted a curving bottle that didn't really have any squared off shapes. I also decided to add a pour spout.


Technique: I used network surface for the bottle and then did the inner bottle using offset curve and network surface with some edits to the curves. The neck of the bottle was extruded from the bottle and then capped. To get the neck and bottle to blend better I used blend surface. The cap and screw threads were made using the same techniques as in the video tutorials. The pour spout was made with a pipe solid, with the shape desired projected and trimmed, then blended.


Materials: I chose plastics for the bottle; a clear plastic for the spout, a cloudy plastic for the cap, and a rougher plastic for the bottle. If I had more patience I probably would have added layer details in the modeling stage, but this bottle was incredibly frustrating to get to work so I focused on getting the shapes correct.

Sunday, February 14, 2016

Charlotte Guzman-Russell Week 4: Detergent Bottle

Concept: For this model, I wanted it to look like something someone would actually purchase at a store while maintaining some level of sleekness. For the final model to bring into KeyShot I projected a curve onto the bottle simply for superficial purposes, so either a label could be applied or the liquid inside could be seen through.

Technique: I used the rail sweep tool with curves to construct the body of the bottle as well as the project curve tool for the label. The screw and cap was fun to make and I used the boolean difference tool and the polar array tool to create the notches on the cap. I then used the fillet edge tool on all the edges I wanted rounded out.

Material: I wanted the bottle to have bright, eye catching colors so that if it were actually in a store someone would see it and consider buying it. I also added a clear plastic material to the projected curve because I thought it would be cool if you could see the liquid detergent inside.


Monday, February 8, 2016

Ashley D Goodenough: Detergent Bottle

Concept: The design for my detergent bottle got sort of out of hand, but I’m warming up to the results. I wanted it to have balance, but also have some pretty dramatic curvature in the overall shape as well as cutouts. I went crazy on the curve projection and ended up with a bottle that looks like a horrifying face from the side view. 
Modeling: This bottle was primarily made using curve tools and curve analysis. This ensured tangency and that the form would have volume and be a water-tight build. I also used sweep2, cap, filleted edges and blended edges.  Split, Booleans in all their forms, Cap, Explode, and Patch were used to close and combine objects. To create custom cross sections curves, I used control point curves and arcs.
Materials: Detergent bottles are really only made of one or two materials at the most in real life, right? For the body of my bottle, I used three contrasting colors of soft rough plastic. I did this to accent the curved features of the handle and bottle base curve. For the lid, I decided to use a clear rough plastic with a light gray color to make the threaded bottle top and threaded lid visible.