Showing posts with label ATCM2355. Show all posts

Sunday, September 12, 2021

Sigrid Rittby: Week 1 Castle

Concept


I wanted to emulate Lothric Castle from Dark Souls III. In the game, the castle has lots of turrets and other aspects of gothic architecture. Since I did not have enough skill or time to add a ton of extra detail, I decided to simplify it to use a large exterior wall mounted on a hill with some buildings inside it.

Techniques 


I made heavy use of Boolean Difference to add detail to objects. I made the exterior wall using several cylinders of different sizes and subtracting to make a thick wall with a thicker top half than the bottom half. I then chamfered the edges to make a smooth transition. 

To make the turret I used cylinders and more chamfered edges with a cone on the top. I made heavy use of the copy command with various reference points to duplicate the turrets while making them consistently spaced.

I made the ramparts by making a rectangle perpendicular to the outer edge of the wall, then revolving it for a fixed angle to make a solid. I then used the array command to repeat it around the wall's edge at fixed intervals. I did a similar process for the smaller towers with ramparts at the top.

To create the archways, I created a circle curve on one face of the solid, extruded it through the solid to the other face, and then did a boolean difference to create an arch.

In order to populate the interior of the castle a little bit, I created some planes to represent streets and boolean unioned some boxes to create pseudo-buildings. I also created a market square with some covered stalls scattered through.

Materials


I wanted to use some relatively realistic materials where possible while still maintaining contrast between the different surfaces. However, I was unable to find a good soil material for the dirt underside or a good roof shingle material for the rooftops. Instead, I went with a smooth and reflective brown material for the base, giving it a nice contrast with the otherwise rough castle surfaces. I had to use a brick surface for the rooftops as an emulation of a roof tile material.

For the market stalls, I used a dark wood material for the stall surface and a blue fabric material for the stall cover.

I used a stone brick surface for the main castle structures, and darkened that material for use in the turrets. I had to make several instances of the material with different scale factors to account for the different sizes of structures.

Monday, April 13, 2020

Delaney Conroy: FlatFab Render

Concept: I based my design on a conch shell in order to look at the negative space both in the structure of the design, as well as the opening of the shell.
Process: I played off of the organic and curvy shape of conch shells in this piece. I used a single rod in the center to shape on in order to match the axes. I removed this base and then went in with spine-like ribs to give more structure and form to the shell. It was interesting to match the curves of the shell, giving it a very natural feeling.

Materials: I rendered this piece in a semi-reflective, slightly translucent plastic that was tinted blue, giving it a deep sea feeling.


Sunday, April 12, 2020

Delaney Conroy: FlatFab Model

Concept: I was interested in exploring the use of negative space in this medium, which lead to my model of a conch shell-like structure.

Process: I used a single rod to center the shape on and match major axes. After removing this, I added the spine like ribs. Shaping the curves to match from different views was challenging, but interesting, especially considering the opening of the shell.


Materials: I could see this model being made from a clear or tinted acrylic, as the light passing through it would give a life and glow to this shell.

Monday, March 9, 2020

Delaney Conroy Render Passes

Concept: I wanted to work from my 3D model, but instead of using the exact same model, I returned to the original shape. I removed the hole and flat base and further tessellated the faces and played with that until I got a shape I liked.


Techniques: I used layer effects, as well as combinations of passes in order to create these images. For the first, I let the smooth specular pass, as well as the wireframe take the forefront, while in the second, the rough specular pass and diffuse had much more of the focus. For the third image, I reflected after class and pushed myself to make something less conservative and place this object into a reality. For this I manipulated the wireframe and diffuse layers more to emphasize the inward tessellations while washing out the exterior, creating a glowing, lantern like object.
Materials: The materials depended on the pass I ran in Keyshot, but overall the model had a chrome base which I loved the reflections from.


Monday, February 24, 2020

Delaney Conroy: Week 7 3D Print

Concept: The inspiration for my design was these minimalist plant holders. I have a small glass that I have been using for propagation and wanted a way to incorporate it into this project. The constraints of this meant that I had to use exact measures of the glass itself, as well as allow for light to penetrate the design in order for it to remain functional for propagation. 


TechniquesIn TopMod, I played with the remeshing tools in order to get a tessellated design that I liked on the surface of my icosahedron base. I used the wireframe modeling 2 to make the thin but intricate detail across the surface. Next, because I knew I wanted this to exist on a flat surface, I used the cut by face tool to flatten one side of the model, before taking it into rhino and using the control points to remove the opposite face to create an opening. 

Materials:I chose an aluminum material to show the intricacy of details in this piece as well as emphasize a light feeling within the design and its scene.


Monday, February 3, 2020

Delaney Conroy: Week 1 Castle

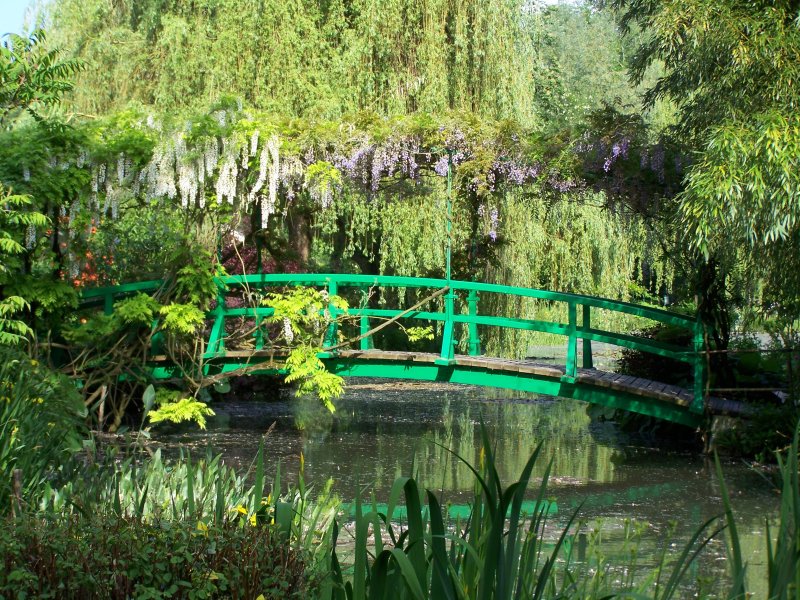
Concept: Since the prompt was castle, I thought of my favorite kingdom, and based my design off of Claude Monet's gardens, specifically his Japanese bridge. I took inspiration from the forms of the bridge and the waterlilies that he painted. The simple, natural, and airy feel of Monet's gardens and bridge were the ideas I wanted to encapsulate in my piece.


http://giverny.org/gardens/fcm/giverny.jpg

Technique: This was my first ever 3D model and I definitely learned a lot during the creation of this model. The technique I used was a lot of duplication of forms to create uniformity in the support accents of the bridge. I used the create arc tool to make the lotus like structures that lead up to the bridge. If I were to expand on this project I would push the bridge aspect of the model more


Materials: For the materials of this piece, I used more natural materials to reflect the naturalness of the inspiration's concept. Woods were used for the roof and body of the build, while the conical supports were made of grey frosted glass. The outer ring and lotus guards were concrete, which grounded the piece and provided contrast.

Sunday, April 28, 2019

Jack Purcell: Week 12 - Laser Engraved Skateboard

Concept: I wanted to create a skateboard that represented me. I thought I could accomplish this by incorporating a pseudo 3D element and my personal logo. I chose a 3D grid pattern illusion to represent the 3D aspects of my life as I want to go into the 3D industry  myself. I also Incorporated my personal logo and modified it to be viewed from any angle. I felt it would be important to represent myself with this skateboard as skateboards tend to represent their owner in some way.


Processes: I created the repeating pattern in Illustrator using the pathfinder tools and grouping to maintain a constant distance between the elements. I also centered my logo and measured where the trucks would be when attached and placed blank spaces to the trucks would lay flat. In my design I made the pattern larger than the edge so that way the board wouldn't have to be perfectly centered on the laser. Instead of using the laser at the machine shop I used the laser at the Dallas Makerspace and was able to get a much darker engraving that was able to utilize more of the board.


Materials: The board was finished with some kind of coating that vaporized when on the laser and left soot and sticky residue. A trick I learned when laser engraving something awhile back was that those Magic Eraser cleaning products work wonders on the soot left by the laser. If I had to make this board again I would want to create an inlay with a darker wood and seal the board with a thick resistant resin.


Jack Purcell: Week 13 - Laser Scanning

Concept:  For my scanning project I wanted to scan in something meaningful to me. I scanned a miniature Terracotta warrior that my great grandfather had given me. I thought that this would be perfect as not only would it preserve a piece of history, but also the fact this was a smaller version of the much larger warriors and that I could scale it up to its full size digitally.


Processes: I used the NextEngine 3D scanner to create the initial scans of the objects and aligned them in the NextEngine software. I then fused the models together in RapidWorks and exported a very high resolution mesh and a nurbs patch file. Because there were people waiting behind me to use the scanner I opted to lower the resolution of the mesh later in Blender.


Materials: I chose to represent the Terracotta Warrior with a low poly and brass aesthetic because I feel it would bring a modern element and show the fact that it was digitally scanned while also having the look and timeless feel of a brass statue.


Saturday, April 13, 2019

Jack Purcell: Week 11 - Polyhedra

Concept: I knew that I wanted to incorporate geometric designs into my Polyhedra as Polyhedra are based on geometric designs themselves. I also wanted it to incorporate some kind of natural element and in the end I found out that the natural design of spiderwebs compliment the hexagons of my chosen Polyhedra. I also wanted to incorporate another element into my project, and I chose light and turned it into a lamp.

Process: First I imported the Polyhedra PDF into Rhino and separated it into the different layers to be laser cut. I then took that into Illustrator so that I could create the patterns. I created a hole so that I could attach a light fixture and turn it into a lamp. When I originally sent it in to be laser cut I was told it had some problem. I then took it back into Rhino and reassigned the layers, then there was no problem and the file was cut.


Materials: While this project was made with cardboard I would like to make another version out of wood and not have it fold together. I would also like to include a diffusion sheet behind the panels so that the light is evenly diffused.


Monday, April 1, 2019

Andrew Rowan: Week 10 Laser Cutting

Rhino ghosted image

Rhino layered image
Concept: My original inspiration for this piece was a crown conch shell. I thought the shape would work well with slicing and it was very dynamic. I wanted to transform a slice of the upper part of the shell and it's protrusions into the flatter, smaller sections, that are present on the lower portion of the shell. I initially only made the sections flatter, but I realized I could also activate the vertical axis if I made them smaller as well. To add another dynamic I decided to exaggerate this transformation by pushing it all the way to rectilinear shapes, with the main rectilinear slice being opposite the crown conch slice. I wanted this sculpture to be in the round so that people could see all the transitions and how each piece flows into the next.

Rhino laser cut file 1

Rhino laser cut file 2

Technique: In FlatFab I first formed my base circle. I then input the abstract slice of the crown conch shell on the circle. On the opposite side I drew the exaggerated rectilinear shape. I then drew the two intermediary transitions that activate the vertical axis. I then used a blend between adjacent sections. Due to the concave nature of the shapes I had a lot of issues with the shapes being only an outline. I was able to resolve by flipping the curve handles on nodes within the shape. Generally only one node per shape had a "normal flip." After a lot of experimentation with this I was able to pin point the problem node in each shape that had this issue. One of the more extreme shapes required two nodes to be flipped. After this I exported the file as a DXF, used Illustrator as a pass through for an obj file, and finally opened it in Rhino. In Rhino I exploded everything and created the layers. I then assigned everything to the proper layer and forced all lines to the correct color. Finally I laid out all the pieces in the most efficient way I could and sent the files to the machine shop to be cut.


Close up render

Gallery render
Materials: For my materials I decided that the round sectional makeup worked really nicely with the two tone cardboard. I used polished metal for one side of each section as well as the section width. I used chrome on the outer edge to highlight the contours of each piece which helps to show the transition from section to section. I used blue textured metal for the remaining side of each section. I used a blue that was not too bright so as to not take away from the polished metal while still adding emphasis to the contours of the shape. For the retaining ring I used gloss orange paint as a complimentary color to the blue. This helped to activate the horizontal axis and adds another layer of visual interest. I also did not want to hide the construction of this piece. This is because it is, as a whole, very dynamic, but the construction itself is very simple. This will also be more prominent once I add two more smaller rings for stability.

Public display render

Sunday, March 31, 2019

Jack Purcell: Project 3 - Laser Cutting

FlatFab

Concept: I wanted to create something organic using FlatFab. I also wanted to create a sculpture with a somewhat solid 3D form. The main reason I wanted to create a chicken is that it would be recognizable and that I have a friend who loves chickens, it's pretty much a custom between us that whenever we exchange gifts I get them something chicken related, so I've seen many different kinds of chickens represented in many different types of mediums, so I wanted to create my own.
 Process:  I used FlatFab to create this project. I'll admit I wasn't as used to its vector tools as I was to Illustrators tools, but I managed to create something I was happy with. Most of this project was post processing of the file. First I exported the FlatFab cutting paths as a SVG file and imported it into Illustrator. Second I exported that to a DXF that could be imported by Rhino where I fixed some of the errors created by FlatFab. I submitted the 3DM file to be laser cut but something was wrong with the line width and my file was sent back. Finally I fixed the file in Illustrator as it was the program I was more comfortable with, and sent it back and picked up the cardboard once it was cut. I did have problems where FlatFab didn't generate some of the connections properly and I had to cut and glue some pieces together to create the final model together.

Materials: While the material we used for this project was cardboard I feel that this sculpture would best be visualized in a transparent material like glass or acrylic, because I feel like the viewer could see all aspects of the sculpture at once and appreciate the form.


Monday, January 28, 2019

Jack Purcell: Project 1 Castle

ghosted image


layered image

Concept
I wanted my castle to give off a sort of futuristic oppressive Sci-Fi vibe. I wanted it to represent architecture that couldn't exist with today's technology. I also wanted it to be intimidating, because while Castles  do house people they also serve to protect and display power.
bird's eye view


Process
I used plenty of booleans of larger spheres to create cavities to house the smaller spheres. I also drew the main two towers using the draw curves tool and extruded them to create the base of the two towers. I also drew and extruded solids to subtract from the towers using booleans to give them their triangular prism shape.
ground view


Materials
I gave the main orb in between the two towers an emissive material to achieve the Sci-Fi look. I decided on a purple gold and while color palette for the rest of the materials to make it look appealing and also break up the model into different colors. Almost all of the materials are some form of brushed metal, I chose this because I thought it would also fit the futuristic theme.