Showing posts with label fall2022. Show all posts

Monday, December 5, 2022

Brittany Han: Skateboard Extra Credit

 Inspiration:

        I wanted to do something with a cool design for the skateboard. My mind immediately whet to traditional Koi Fish Tattoos. I have always thought they looked awesome and I think having a koi fish shredding down a half pipe would look sick.


Modeling:

        I started modeling by making the initial curve of the skateboard. I then closed this curve and extruded it out into the needed width. I boolean differenced of the corners to make the deck look more like the moderne style board decks. I found a cool koi design online and added some water to the edges to get the effect I wanted.


Render:


    Knowing that the skateboard would be wood I moved my model into Keyshot. I used the fine grain wood texture on the board part if the model. For the engraved part I left it a plastic black so its easily seen on the render model.


Brittany Han: MakerCase Lamp

 Inspiration:

    I honestly didn't have much of an idea for a while on this project. I knew I wanted to make something DnD themed but wasn't sure what so I looked at a few images online and found some dice towers. These are what inspired this lamp as well as shadowboxes of various themes. 


Modeling:

    I started by making the designs using the curve tools within the allotted space of the box given to me. Once that was completed I copied them to another layer and extruded them. I caped these new extruded surfaces and moved the together until they form the desired box shape.


Rendering and Printing:

    I took the finished 3D model and imported it into Keyshot. Knowing I would want this to be wood I used one of the presets to make the render look as though it was made of wood. Though the dragons eye didn't stay, I was very impressed with how this lamp turned out and very proud of the accomplishment this being my first time laser printing anything.
 
Render Front

Render Back

Light Off


Light On


Designs on the Wall


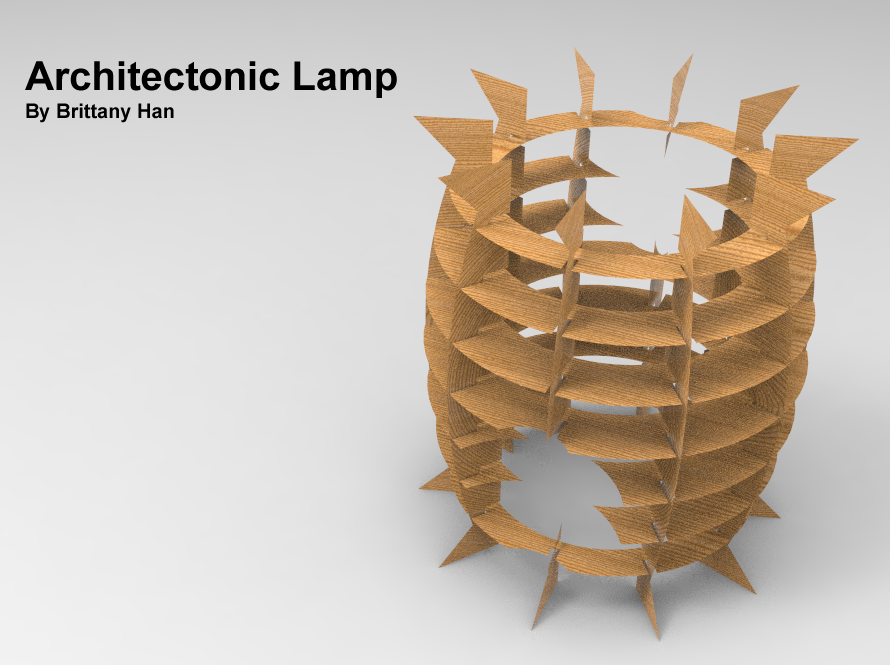
Brittany Han: Architectonic Lamp

 Inspiration:

    The inspiration for my architectonic lamps are the old kerosene lamps. I tried my best to stick to the feel of these old lamps, but still keep it simple enough to easily be cut out of my material. Since the eye catching part of the kerosene lamps is the middle where the flame is held this is the section I decided to emphasize. 


Modeling:

    The first step I took while modeling was getting the overall shape I wanted. I accomplished this my using the curve tools and then revolving the shape 360 degrees. I then put the finish polyshape into grasshopper with the grillage coding provided and set the setting to what I thought looked good. Having finished the model to what I wanted, I told the program to slice the sections and laid them out onto a 2 x 4 sheet.

3D Model
Model Layout

Render and Print:

    I took the finished 3D model and imported it into Keyshot. Since I am going to be using wood to make this lamp, I choose one of the wood materials available inside Keyshot's favorites. 


 Lamp Off


Lamp On


Lindsey Nguyen : Week 15 Prosthetic Accessory

 Design Intent


For my prosthetic project, I wanted to remodel what is called the Life alert bracelet. I feel like that should be a necessity for older people or people who can’t really speak or help themselves. I wanted to change the look of it as some are way too plain simple, and does not  speak character. I used this opportunity to use the honeycomb pattern, as I feel like it represents what a life alert does. Everyone has a role in life and those people are willing to help people who are in need. I decided to go for the bee design because bee’s work together and help one another. 


Modeling Techniques


The modeling techniques I used is that I started off with a polygon that has six sides and created it with an offset curve then extruded curve planer straight to get my solid. Then made an array of it right next to each other. Then duplicated the copies to create a row of them top and bottom from my original model. The top of the honeycombs were then fileted and I picked the center of one and scaled 1-D to pop out. Then I created the end of the bracelet with a square and used a gumball to model the end of the surface. Once I was done with the bracelet I created the button, which was used by creating two circles and lofting it. Then placed it in the center of the honeycomb that was protruding out. Once I was done with modeling the design, I had to actually make it into a bracelet so I flowed the bracelet to a circle then I was finished with my piece. 


Rendering Materials 


For the rendering materials, I decided to texturize the bracelet with honeycomb texture to really go with the theme of the message. I also placed the material to be plastic as most life alert bracelets are made in that type of material. For the prosthetic model, I used the texture of skin to render out so people would know how it would look on an arm.


Brittany Han: Prosthetic Accessory

 Concept Inspiration:

    My inspiration came from the cute Ranchu Goldfish. I wanted to capture the known silhouette of a goldfish with this mask. I combined the smooth scales of the fish with a functional mask to make a soft on the skin mask. I thought it would be cute to walk around with little fins.


Process:

    I used the provided female face to model my mask onto. I used a combination of curve extrusions as well as premade shapes to get the desired look onto one half of the face. I boolean differenced any unwanted geometry, then I mirror these shapes to the other half of the face. I then used boolean union to join the two halves together.
Model 3/4
Model Side
Model Front
Model Top

Rendering and Materials:

    For my materials I choose to go with items that would feel soft and cool against the skin, like fish scales should. For the main mask section and the straps, I went with a leather material. The lips and fins are made of a durable plastic. and the vents are made out of a hi-dense foam to help with air circulation.
Render 3/4 View

Render Side View


Sunday, December 4, 2022

Thessa Vu - Assignment 4 - Serial Slicing Creature

 Inspiration 

    I decided to base my creature on a variety of animals. The basic anatomy of my creature is that of a human. I wanted to add aspects of feathered creatures because I liked the flowy and graceful look, so I made it into the hair of my creature. I also added antlers to incorporate aspects of a deer into it. I decided to give my creature a tree theme, so the antlers are made of wood and the feathers are colored like leaves. The face of the creature is not based on anything, but I wanted to give it a minimal look. The eyes are just dots to make the creature look mysterious and otherworldly.

References

Concept

Process
    
    For modeling my creature, I first started by making the base. I created an oval shaped cylinder and then used the fillet tool to round off the top for the shoulders. Then, I created a cylinder for the neck. After, I created a sphere using the subD tool and modeled the head. As I worked on the head, I used the mirror tool to make sure that both sides were equal. After I finished creating the shapes I wanted, I used the Boolean join tool to combine all the pieces together. I also used the subD and mirror tool to create the antlers. After I sliced the image, I extruded everything and used the change layer tool to move each item that would have its own material assigned to it onto different layers.
    As I was modeling my project, I had an easy time using the subD tool with the mirror tool. It allowed me to form the shapes that I wanted easily. However, I had a problem turning the model into a solid object after I was finished with it. After I Boolean differenced out the rods and sliced the image, the rods did not go all the way through. So in the end, I laser cut all the pieces and put the head together without the use of the rods. Also, there was a lot of small pieces created but the tips of the antlers when modeling. So after laser cutting, I decided to just leave out all the small pieces and make the antlers short.

Rhino - Ghosted - Layers


Rendering

    In keyshot, the main body of my model was assigned the material of rough maple wood. The antlers were given the material black walnut wood and the leaves were given green satin cloth. I used these materials to keep the tree theme of my creature.

Keyshot - 2D

Keyshot - Orthographic

Keyshot - Environment 1

Keyshot - Environment 2

Fabrication

    For my physical model, I laser cut the base of the cardboard at the machine shop. Then I combined every layer together with two dowel rods and glued it all together. The antler cardboard pieces had too many little pieces, so I decided to leave a lot of it out and ended up making it a lot shorter than in the rendered model. I used newspaper, flour, and water to paper mache the outer layer. I then painted the outside with acrylic paint. I decided to use white as the main color to keep the design simple and to allow for the leaves to stand out. After painting, I glued all the leaves onto the head and painted on the eyes.


Physical Model

Physical Model - Orthographic

Physical Model - 2D