Showing posts with label prosthetic. Show all posts

Monday, December 5, 2022

Taylor Champ Ballet Prosthetic

 Design Inspirations


I drew my inspiration from pointe shoes, ball joint dolls, and feathered wings. I wanted a delicate feminine form as well as a unique prosthetic with a specific purpose: ballet. When I decided on a design, I went about sketching it.

Sketch


I had several considerations, primarily the natural flow of human muscles, and how it wraps around the thighs and calves. I wanted to make my design accentuate the form of the leg, not impede dancing, and be thematically appropriate for Swan Lake.
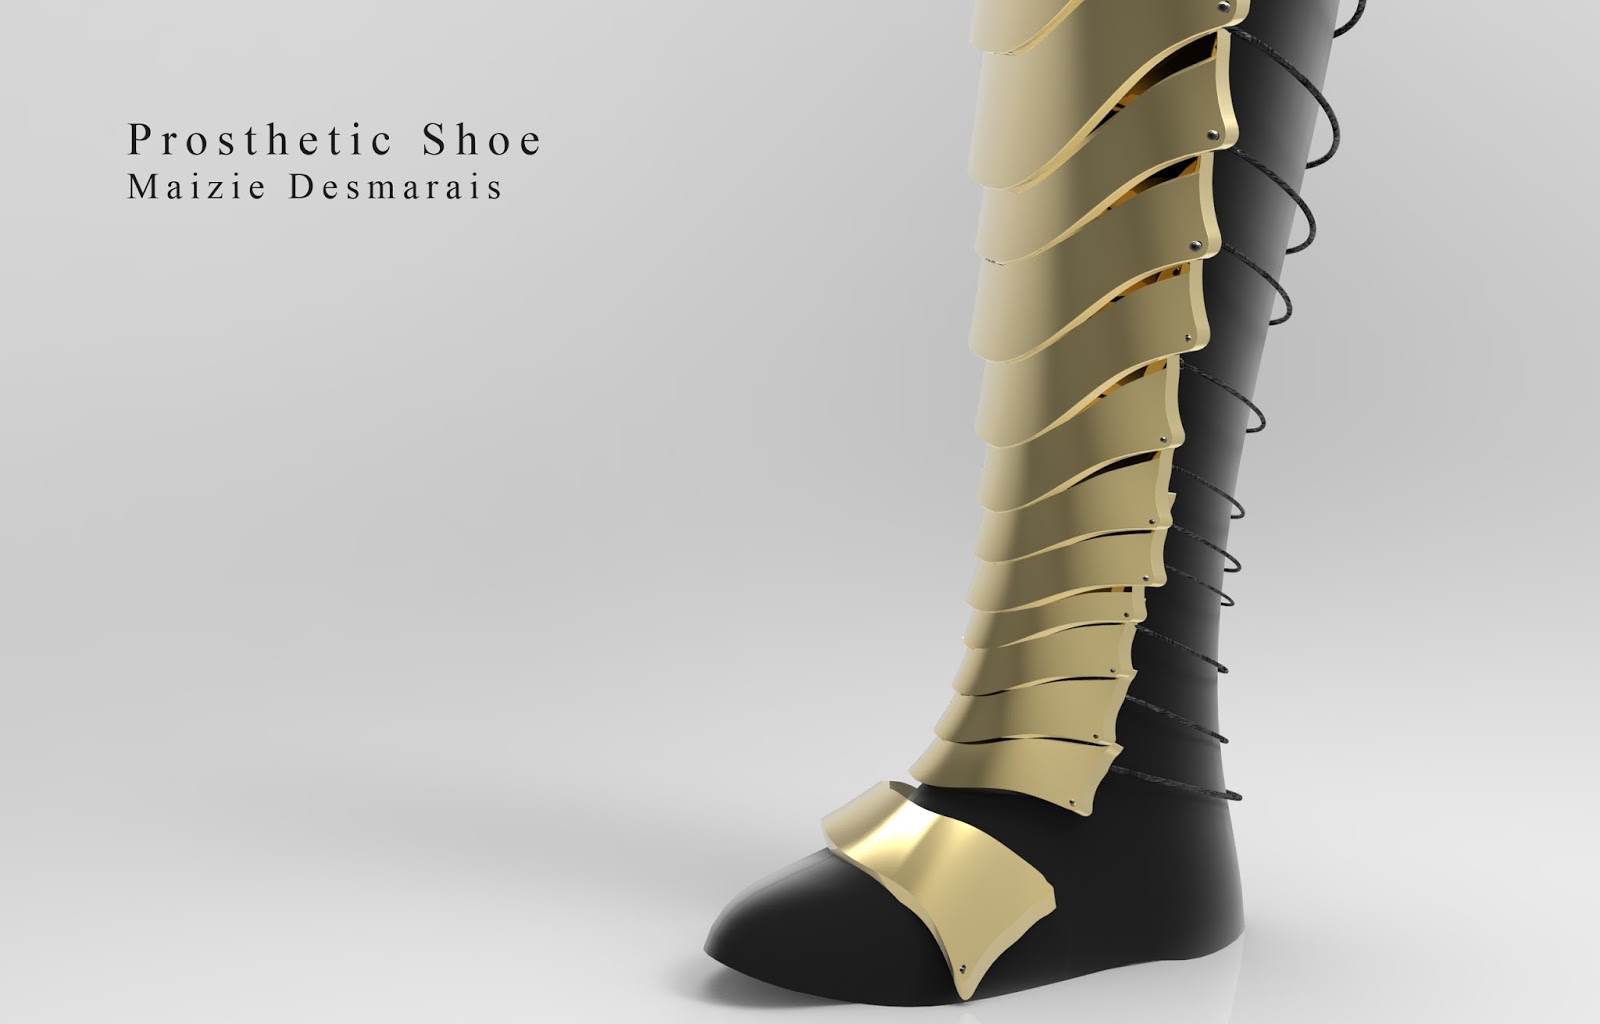
Modeling (Renders)


Given the organic nature of these forms, I focused on sculpting and poly modeling, differing from my modeling method in other projects. During the process, I referenced ballet forms. For my final render, I purchased, altered, and simplified a ballerina model to pose with my prosthetic.


Alexandra Escobedo: Week 15 Prosthetic Model

Prosthetic Model (Voice Generation Device)

Inspiration

The inspiration behind this model was making an improved voice generation device (VGD) for those who lost their ability to speak. I wanted to make something that was both useful and potentially life changing for people who can no longer utilize their voice. If I were to have this concept fully realized, I would want the voice modulator to sound as natural as a normal human voice, rather than keep a robotic voice that is currently in use.


Process

The process involved making the output piece for the VGD which would be a torus shape. On the sides of the torus, I added the attachment pieces using the rectangle shape tool; this would be what attaches the prosthetic to the person’s neck and throat. The circular elements were created with the circle shape tool, and these are the screws that would keep the VGD in place.


Materials and Techniques

The materials I used were bronze, titanium, and a mesh for the VGD pieces given that certain parts would realistically be made of those materials. Some of the tools I used were the torus shape tool, rectangle shape tool, pyramid shape tool, polar array tool, and the circle shape tool. The main technique that was utilized was the polar array technique to make perfect copies of the attachment elements of the VGD.


Lindsey Nguyen : Week 15 Prosthetic Accessory

 Design Intent


For my prosthetic project, I wanted to remodel what is called the Life alert bracelet. I feel like that should be a necessity for older people or people who can’t really speak or help themselves. I wanted to change the look of it as some are way too plain simple, and does not  speak character. I used this opportunity to use the honeycomb pattern, as I feel like it represents what a life alert does. Everyone has a role in life and those people are willing to help people who are in need. I decided to go for the bee design because bee’s work together and help one another. 


Modeling Techniques


The modeling techniques I used is that I started off with a polygon that has six sides and created it with an offset curve then extruded curve planer straight to get my solid. Then made an array of it right next to each other. Then duplicated the copies to create a row of them top and bottom from my original model. The top of the honeycombs were then fileted and I picked the center of one and scaled 1-D to pop out. Then I created the end of the bracelet with a square and used a gumball to model the end of the surface. Once I was done with the bracelet I created the button, which was used by creating two circles and lofting it. Then placed it in the center of the honeycomb that was protruding out. Once I was done with modeling the design, I had to actually make it into a bracelet so I flowed the bracelet to a circle then I was finished with my piece. 


Rendering Materials 


For the rendering materials, I decided to texturize the bracelet with honeycomb texture to really go with the theme of the message. I also placed the material to be plastic as most life alert bracelets are made in that type of material. For the prosthetic model, I used the texture of skin to render out so people would know how it would look on an arm.


Brittany Han: Prosthetic Accessory

 Concept Inspiration:

    My inspiration came from the cute Ranchu Goldfish. I wanted to capture the known silhouette of a goldfish with this mask. I combined the smooth scales of the fish with a functional mask to make a soft on the skin mask. I thought it would be cute to walk around with little fins.


Process:

    I used the provided female face to model my mask onto. I used a combination of curve extrusions as well as premade shapes to get the desired look onto one half of the face. I boolean differenced any unwanted geometry, then I mirror these shapes to the other half of the face. I then used boolean union to join the two halves together.
Model 3/4
Model Side
Model Front
Model Top

Rendering and Materials:

    For my materials I choose to go with items that would feel soft and cool against the skin, like fish scales should. For the main mask section and the straps, I went with a leather material. The lips and fins are made of a durable plastic. and the vents are made out of a hi-dense foam to help with air circulation.
Render 3/4 View

Render Side View


Sunday, April 5, 2020

Nikki Chauhan: Mass Model

For this project I am doing a filtering mask which will have straps and small filtration areas as well as a larger area to allow for more air flow through the nose and mouth area. It will also have an eye piece attached with straps for that as well. For my mass model portion of my project I have blocked out the bottom portion shape as well as a shape for the eye piece which will just look like science lab goggles attached to the base piece. In my research, I saw that many masks either had small filtration patches or full air bag type features to circulate airflow so using that I plan to implement small filtration patches under the nose and on each side. The design for my straps comes from incorporating various designs of half-face masks and full respirator masks to create a lighter scale piece which will securely stay on the face as well as feel a little lighter due to the top strap which similarly to VR headsets, will be a velcro piece so it can be properly fastened and loosened. The four straps at the front will be combined into one strap behind the ear and those straps will meet the top strap at the back of the head at a loop piece.

Currently, I have the base front piece done, having trouble with getting the  goggles curves to project properly.


Monday, February 27, 2017

David Rake: Week 8 - Prosthetic


Concept:
As an avid Mechanical bike rider I aimed for a bike related prosthetic. From the original drawing to the actual model slight tweaks were made in favor of a more realistic design. Instead of trying to curve the gears around a leg shape they were laid flat so actual gears could be put in place and be kinetic as well. Another addition is at the bottom where the foot would normally be I put a typical clip design for clip in shoes on road bikes.


Technique:
Starting with the gears they were modeled with curves and the teeth were polar arrayed around the center and slightly modified for imperfections. The top gear has 16 teeth and the bottom gear has 12 teeth. The indents in the gears were subtracted later using booleanDifference along with the holes going through them. In regards to the chains they are made with curves as well. They contain of 2 circles and a small curvy hourglass shape with a larger version of the same shape just outside of it.
These hourglass shapes were alternated along the pattern to create the full chain link. The smaller gear is directly in the center of the larger gear and so the chain tapers off towards the bottom instead of going straight up and down which I found difficult to work with. After trying (unsuccessfully) polar arrays to wrap the chains around the gears I resorted to manually rotating the chain around, which was not near as hard as I thought it'd be.
 The 2 gears and chain were then duplicated and positioned around the origin. The Bottom gear was rotated inward to almost create a seal in between the sets of gears. A cylinder was added in the center with other cylinders matching the angle of the gears to ensure a flat looking cap. the gears were booleanUnion(ed) to the cylinders and the bottom piece was added on with more simple boolean cylinder cutouts in the bottom for clip in pedals.


Materials:
I used a darker metal (Anodized Black) for the inner cylinder and gears. The chain used a lighter metal to highlight it (Chrome polished). These two materials are ironic due to their real world counterparts where the chain would more likely be dark due to oil and more abusive wear than the gears. This reverse setup looked much better in this situation however. The other material scheme caused the inner pieces to be difficult to see in depth.

Maizie Desmarais: Week 8: Prosthetic


My prosthetic shoe was based off multiple video game character shoes, especially the Paladin. I wanted to have something more armor based and different from shoes we wear today. I also wanted the armor to be optional to wear, so there are strings in the back to hold it up against the boot for a unique design. 

To create the basic shape of the boot, I used multiple curves to get what I wanted in the front and on the side proportional. I then lofted with those curves and had to rebuild the geometry to get a simpler and smoother looking model. For the armor I also used curves of the shape I desired then mirror over to keep it as even as possible. After I had the final curve I duplicated it behind and used sweep rail 2 to connect and patch for each side. To keep the strings attached to the armor I created rings with a torus and used boolean difference to connect it inside the armor so the laces could loop around.

Armor is primarily metal-based so I used a gold material to render out as if it were metal. The boot is suppose to be comfortable with a softer look to it, so for that I used a cloth material. The laces were also cloth and the rings were a black metal that will stand out from the gold.

Rebecca Genung: Week 08 Prosthetic


For my concept I wanted to create a prosthetic leg that resembled that of a Theropod, specifically one that resembled a Dinosaur. I have always admired dinosaurs, specifically Theropods as they developed a larger, quicker, and less complex form of bipedal movement millions of years before man. The evolutionary significance of Theropoda is quite impressive, and that is without going into the detail of the individual species. I take great joy in the near constant discoveries we have made in recent years in regard to figuring out these amazing creatures who once ruled the world. The best part is that dinosaurs didn't die out entirely and their legacy goes on in the form of birds: the best fliers, in both maneuverability and energy use, to ever live on Earth. The overall form of athletic prosthetic tend to resemble Theropod anatomy to begin with. Hypothetically, this would be a cover for a proper blade prosthetic. 

When the entire thing is broken: fix everything.


For my technique, I redid everything: including the design. In my origanal, I tried to push my boundaries by attempting an organic form and I grossly overestimate my abilities. I apologize. This model is all done with previous techniques. I filleted what I could. The bases, orbs, and pole are modified shapes. Everything else was created from curves.


For material, I exclusively used metals. I used titanium for the inside base pieces and the center pole. The "padding" and blades are chrome. I originally had the whole piece silver-colored but I found it to be too gray-scale, so I changed the materials of the crests to blue zinc and the orbs to a blue smooth metal I manually made darker.