This post has all content for Assignment 8, Pepakura (Robopawn)
See all updates below the fold!

Showing posts with label Fall 2014. Show all posts
Showing posts with label Fall 2014. Show all posts
Friday, December 5, 2014
Monday, December 1, 2014
Andrew Kelly: Project 7: Geometric Unfolding
This shape is the union of a cube and a diamond-like octahedron.

This is layout was done entirely in rhino - illustrator is my mortal enemy apparently, and I figured out a way to get a roughly equivalent result - the lines are 50/50 space/line for mountain folds an 35/65 space/line for valley folds. This object is going to be very pleasant to the touch.
Finished object

Monday, November 17, 2014
Andrew Kelly: Project 6: Architectonic Lamp
Thematic Description
I wanted to make a device that would fit in with my home's current aesthetic - a little strange, a little spartan, with interesting shadows, and I wanted to see what types of things rhino would get out of lofting different N-gons.
Build Notes
I made it a half-sheet for some reason I can't remember (material warping maybe?) and the lamp layout was as you see below:


However, I failed to account for the height of the bulb in the design, and once I assembled the lamp the bulb basically half-emerged from the top. By a thrilling turn of chance, I had decided to get a full sheet cut, giving me two lamps but with only a single light kit; the lamps' vertical ribs lined up!
The Double-Lamp!


I am intensely happy about this accidentally wonderful lamp - I'm thinking about getting some vaguely-opaque, non-flammable sheet material and rolling it into a tube, and inserting it, so the bulb gives a more diffused, uniform light. Tested with a paper-towel for reference:

Andrew Kelly: Project 5: Waffle
Thematic Description
For my waffle assignment I wanted to make something that could be a monument at the right scale, but with movable parts, since all the projects to this point have either been single-piece or a system of just theoretically connected pieces. The idea of a ball-socket joint seems like the simplest abstraction of a system complicated enough to make the misaligned waffles I desire.
References
I was inspired by a number of pictures on reddit.com/r/infrastructureporn (beautiful photos of infrastructure from 'round the world), as well as this piece: (original artist = Johnathan Solter)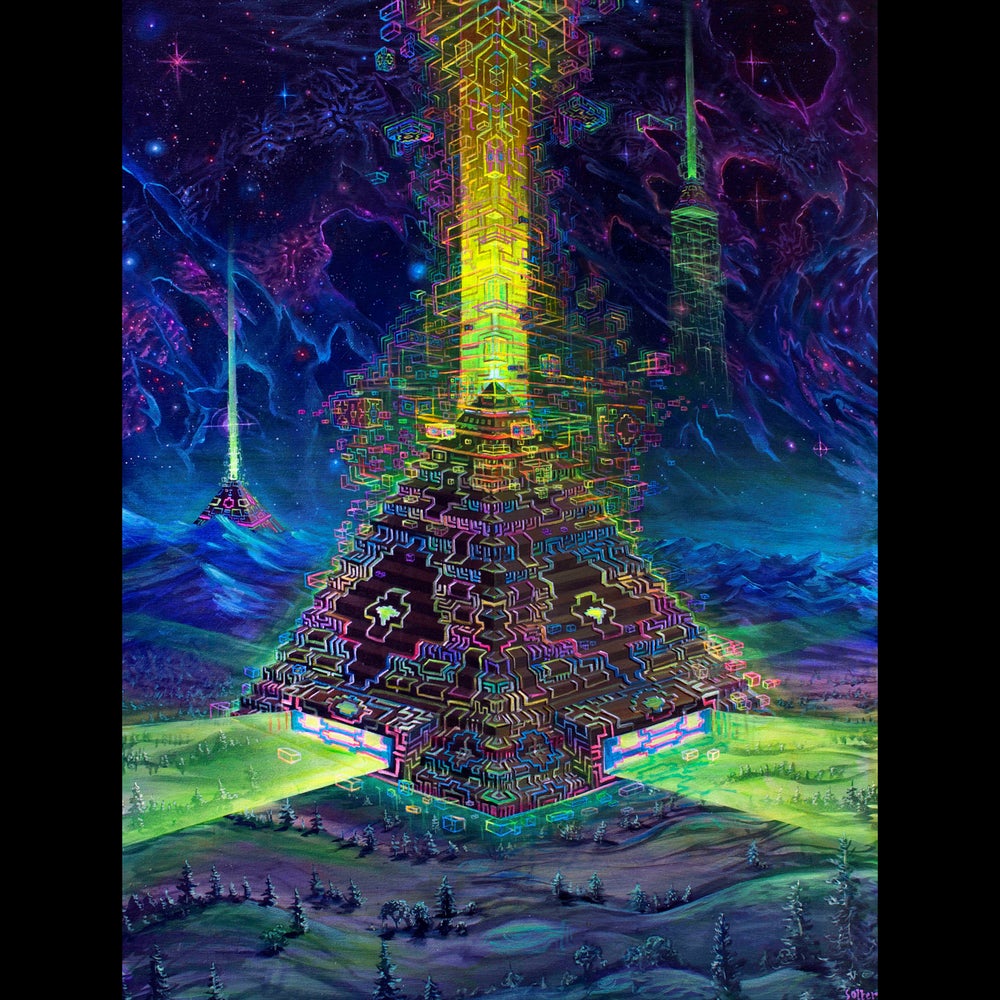
Rhino captures
Something strange was happening with the display, couldn't get my rhino to handle transparency properly, shaded, wireframe, or ghosted, but instead the entire object gets rendered with the faces more parallel to the camera being more visible.

Keyshot Renders


Assembly Complete!

Christopher Chambers: Project 6 Lamp
For this project I decided to try something different, compared to the last few I have submitted.
Instead of creating an object that mimics that which it portrays directly as I had with the hammer and anvil, I decided to opt for something 'verbatum' and more inherently representative.
Instead of creating an object that mimics that which it portrays directly as I had with the hammer and anvil, I decided to opt for something 'verbatum' and more inherently representative.
The decision of content was a tough one, but having a light fixture that is in need of a lamp-shade already available I decided to go that particular route - which in turn brought me to lamp-shade-like shapes, which in turn lead me to a decision that only someone such as myself would likely make:
To make an engine cowling as found on a radial-engine fighter aircraft. However, as stated above, I chose a more allegorical route than one of direct-representation - and, in turn, decided to combine visual features of two very distinct enemies...
To make an engine cowling as found on a radial-engine fighter aircraft. However, as stated above, I chose a more allegorical route than one of direct-representation - and, in turn, decided to combine visual features of two very distinct enemies...
The USSR's Lavochkin La-5FN, and the Third Reich's Fw-190A-8.

.jpg)
(Images courtesy Ssawka of wikipedia.pl under GNU and http://www.warbirdphotographs.com respectively)
These fighters (respectively, in the models represented) were constant adversaries over the Eastern Front, both later models in the earlier lineages of their respective lines of development.
Elements chosen from each were the most distinct - the straight-line cowling, radiator slots, and recessed fuselage gun mountings of the Fw190A-8 as well as its turbine-esque cooling duct were used, while from the La-5FN I opted to incorporate its recessed radiator exhaust ports and propeller cone, though (per its usage as a lamp) I'd included the 190 cone's fitting for a 'motorkanone' - the hole through the top.
---
The result, in turn, was this.

---
Formatted for laser-cutting, per its size, it takes up roughly one and two thirds 24x48 inch sheets. The object stands 13 3/4 inches tall, 11 inches around in its widest diameter.

---
The lighting on this lamp shines primarily upwards, mimicing the cannon fire of the respective aircraft, both of which bore centrally fitted armament. Half of the lamp shows light easily while the other fights the light, accomplished through the placement of the radiator exhaust ports. This both prevents glare on devices in the room its intended for as well as underscores the aformentioned rivalry, light fighting shadow far less fatally than the pilots of these dueling aircraft.


---
Here is the finished, laser cutter-produced product. The lamp's base was alas not designed to support its weight without tilting precariously, a lesson learned for future iterations!

Here is the finished, laser cutter-produced product. The lamp's base was alas not designed to support its weight without tilting precariously, a lesson learned for future iterations!
Monday, November 3, 2014
Christopher Chambers: Week 10 Waffles
Containing startlingly less waffles than the title might suggest, I've opted to generate a continuation of the project before last. Thenabouts, if you recall, I created hammers...
So this time, I'd wanted to continue the set by making an anvil.

(Special thanks to the gentlemen Gerald G. and Andy Dingley for providing the image above via the public domain)
Having worked (to the detriment - and subsequent aid - of my tinnitus) on one of these hardy, iron rests before, I felt rather confident in creating this three-dimensional facsimile. I'd felt the shape was incredibly scalable for its geometry, opting to go with a 15 inch length for this particular exercise.
---
I opted to generate it via Boolean unions and differences, utilizing rectangular prisms, truncated cones, and cylinders until reaching this result. The material chosen is .19 inches (~5mm) thick, as shown to the left below.

Per the previous contentions regarding the laser cutter's timetables, I opted to use a 24x24 inch space, though might change this per feedback.

---
Decided to have a bit of fun with the Keyshot renders, if only to show
off some of the versatility of the shape per positioning.
The first two
renders are set in a position that would doubtlessly harm the traffic in
and out of one of the two rooms on the first floor of the ATEC
building, in a space that would very well accomodate a sculpture
otherwise.


The second set of renders were to better show its waffling superstructure...

...And otherwise just to have fun with its shapes!

---
The finished product! Constructed of 1/8th inch hardboard.

Monday, October 27, 2014
Andrew Kelly: Project 4: Slots
Thematic Description
For this project I wanted to make something sharp - no obtuse angles or rounded curves. I want the slotted parts to be used to make structures that prick the sleepy builder.
Here are my initial shapes with reference boxes:

Build Notes
And here is my laid-out sheet of duplicates. I started with an array that was too dense, then moved parts around to get the most out of my material. Even so, there a few small spaces that could have been filled if the material was just one inch larger.

New 24x24 slot layout:

Its Alive!
Themed and vanilla pictures of the end result:


Sunday, October 26, 2014
Christopher Chambers - Project 4: Slots
For this assignment I chose to emulate the shapes of 17th-18th century Citadel fortresses, such as the well-known Casale Monferrato and Citadelle de Québec.
---
---
.jpg)

---


---
I'll be using 5.0mm (.19 inch) hardwood underlayment, and henceforth gloves for the splinters attained therefrom. The images above were maintained via the public domain.
---
Finally, upon noticing a mistake with the innercut, we come to this:

Some finished work! Scorpion constructed by Jenna Nolan, using these parts.

---
And a geometrically linear, doubled structure by myself.

Sean Lenox - Project 4: Slots
Week 9:


Here are my slots, laid out and ready for laser cutting. When putting these together I couldn't help but think of TV remotes, so I made them chunky rounded rectangles with engraved "buttons". This could be because we've been having tons of trouble with our own remote over the past week or so and I just can't get it out of my head.

Something like this, y'know?
I used circles and lines to draw the body, and used a rounded rectangle for the center hole. I used polar arrays and mirrors to get the notches in the right places, and plenty of offset curves for my engravings, also using circles and lines for those. CurveBoolean brought everything together nicely.
I tried to save this as an .stl file, but Rhino just tells me "No surface objects to export." and doesn't save it. Hopefully this isn't a big problem - I have the .3dm file with me. It's still a confusing, though, considering I was able to save my slice sheet as an .stl with no problems. People on the Internet just called it a "bug". Hopefully it will still work.
Week 13:
Here is a photo of the laser-cut slots.

Week 15:
Here is a photo of my slot composition.

Saturday, October 25, 2014
Chris Venable: Slots
My module designs for this project were heavily influenced by traditional native textiles. Below is an example from the Arizona State Museum website created by Marian Nez, a Navajo artist that still utilizes traditional processes to create her designs.

Often when viewing these types of patterns the audience will begin to discover representations of animals or people that were not originally intended by the artist. I feel that this translates well into a project like Slots where we are working with abstract shapes in an attempt to create more representational art.
Below are the modules that I created. I did not work off of a specific "Root" module, but instead I constrained myself with a heavy diagonal/geometric style. I also added a couple of extra pieces to help fill in the margins of my sheet.


My material for this project will be .16" plywood.
Edit - 12/15
Pictures.


Often when viewing these types of patterns the audience will begin to discover representations of animals or people that were not originally intended by the artist. I feel that this translates well into a project like Slots where we are working with abstract shapes in an attempt to create more representational art.
Below are the modules that I created. I did not work off of a specific "Root" module, but instead I constrained myself with a heavy diagonal/geometric style. I also added a couple of extra pieces to help fill in the margins of my sheet.
Edit - 12/15
Pictures.
Subscribe to:
Posts (Atom)