
For this final sleeve design, I decided to use some concepts from my previous "Lightsaber" design to make a model that better fit the constraints of the assignment. The final design is based on a merger between a knurled hand-grip and a WWI British rifle grenade. I chose these designs because they looked fairly complex, but would hold up to the 3D printing process.

Reference 1: WWI British Rifle Grenade

Reference 2: Knurled hand-grip
I made the overall shape and initial ribbing with curves and curve booleans. Following techniques taught in class, I filleted all edges of the curves and revolved the shape to get the initial body. Using a Cube object, a polar array and boolean difference, I added the notches to the upper body. The knurled detail was made using a pyramid object, Arrayed on the Z-axis, and finished with a polar array to wrap around the shaft. Some of the offset lower notches were made using projected, and then piped curves.
The materials used attempt to mimic aluminum. I made this choice because I had initially envisioned the flashlight grip as metallic. I decided the shaft should have a different texture from the grip however and I think this came out better.

Ghost Image: Black

Ghost Image: Colored by Layer

Ghost + STL

Keyshot Render 1

Keyshot Render 2

Final 1

Final 2
This was my first attempt at the Flashlight sleeve assignment. I realized, after it was mostly complete, that I couldn't use it because it was larger than the assignment allowed, but I was very happy with how it came out. It is based on "Luke's Lightsaber" from Star Wars by George Lucas. I attempted to replicate the scale of the original design with the Z axis squished to fit the flashlight length. The overall design came out well, but some of the shapes I decided to leave in their original proportions for aesthetic reasons.

Reference 1
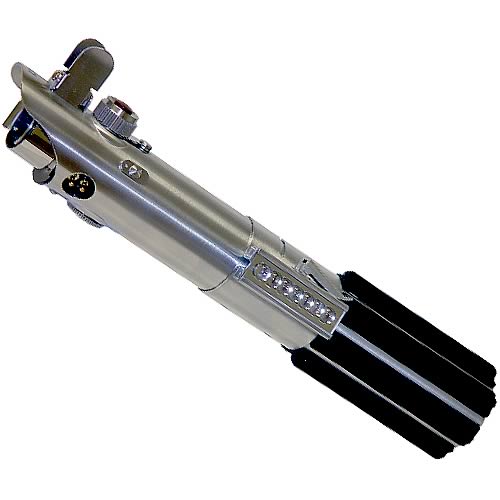
Reference 2
The Techniques I used on this model included Booleans, projections, arrays, etc. I didn't use the original curve shape but for the initial cylinder and center raised edge. Next I created a single rib for the hand grip using several poly shapes and a boolean difference with a plane for the slanted corners. Next I used a polar array to place 7 of these ribs around the base. Next I used several boolean functions on an elongated cube to make the square piece in the middle of the shaft, and then several sphere objects in an array for the buttons ontop. I used a projected curve for the sliced top and the grooves in the middle grip, which I indented using a pipe and boolean difference. I then created several other stick on pieces using various techniques until I was happy with the result.
The Materials I chose for this model are made to reflect the original reference's details. For the shaft I chose a scratched anodized aluminum, which I scaled to fit the size of the model. For the side buttons, I used a clear glass, and the knob button, I used a orange gem texture. Finally, the grips are made from a tire like texture, although I might have liked them to be a shiny plastic instead.

Ghost Image: Black

Ghost Image: Colored by Layer

Keyshot Render 1

Keyshot Render 2
No comments:
Post a Comment