Showing posts with label flashlightsleeve. Show all posts

Thursday, February 19, 2015

Jake Lenzen: Week 5 LED Sleeve

For the sleeve, I wanted to create a simple, practical model. I made a textured grip to prevent slipping, and a rounded cap to help tell where the end of the flashlight is.

I used curve modification, mainly booleans with an array of circular shapes, with the revolve command to create the shape.

For the texture, I chose a blue rubber because its similar to the material grips are made out of.


Monday, February 16, 2015

Roman Hunt: Week 5: Flashlight Sleeve

Of the three sleeves I created for the previous assignment, I chose to submit the third and final design for 3D printing. I felt this design was the most aesthetically pleasing of the group; the numerous narrow notches near either end are complimented by a  relatively smooth middle, created a sense of balance. The holes in the middle helped add visual interest, with the slots in particular standing out as a unique detail that the other sleeves I had created lacked.

Most of the details in the sleeve are a result of editing a curve using the CurveBoolean command. A rectangle split down the middle vertically was used as a base, with various Polylines, circles, and other shapes used to create details. Once a single curve was created from these using the CurveBoolean command, its edges were softened via the Fillet command. After this, the Revolve command was used to create a 3D base for the sleeve. Bumps and indents were created by using spheres and cones in conjunction with the ArrayPolar, BooleanUnion, and BooleanDifference commands. The BooleanDifference and ArrayPolar commands were also used with cylinders to create the holes along the middle. Finally, the Interpolate Points, Loft, Mirror and Trim commands were used to make the two wide holes.

For this particular sleeve, I used a wood material, hoping to create the impression of a hand-carved piece.
Ghosted
Layers
Render 1
Render 2

Monday, February 9, 2015

Roman Hunt: Week 4: Flashlight Sleeve 3

None of the flashlight sleeves I created for this week were driven by inspiration or deliberate artistic expression. Rather, they are the result of experimentation, of trying out the various techniques covered in the previous class and attempting to use them in various combinations to create forms that, if not necessarily meaningful or beautiful, are at least detailed enough to be visually interesting and of sufficient consistency to be aesthetically pleasing. For each sleeve, I used the BooleanUnion command to merge the various objects together, giving the sleeves a sense of being a single piece rather than an assembled conglomerate.

Most of the details in the sleeve are a result of editing a curve using the CurveBoolean command. A rectangle split down the middle vertically was used as a base, with various Polylines, circles, and other shapes used to create details. Once a single curve was created from these using the CurveBoolean command, its edges were softened via the Fillet command. After this, the Revolve command was used to create a 3D base for the sleeve. Bumps and indents were created by using spheres and cones in conjunction with the ArrayPolar, BooleanUnion, and BooleanDifference commands. The BooleanDifference and ArrayPolar commands were also used with cylinders to create the holes along the middle. Finally, the Interpolate Points, Loft, Mirror and Trim commands were used to make the two wide holes.

For this particular sleeve, I used a wood material, hoping to create the impression of a hand-carved piece.
Ghosted
Layers
Render 1
Render 2

Roman Hunt: Week 4: Flashlight Sleeve 2

None of the flashlight sleeves I created for this week were driven by inspiration or deliberate artistic expression. Rather, they are the result of experimentation, of trying out the various techniques covered in the previous class and attempting to use them in various combinations to create forms that, if not necessarily meaningful or beautiful, are at least detailed enough to be visually interesting and of sufficient consistency to be aesthetically pleasing. For each sleeve, I used the BooleanUnion command to merge the various objects together, giving the sleeves a sense of being a single piece rather than an assembled conglomerate.

Most of the details in the sleeve are a result of editing a curve using the CurveBoolean command. A rectangle split down the middle vertically was used as a base, with various Polylines, circles, and other shapes used to create details. Once a single curve was created from these using the CurveBoolean command, its edges were softened via the Fillet command. After this, the Revolve command was used to create a 3D base for the sleeve. Finally, bumps and indents were created by using spheres in conjunction with the ArrayPolar, BooleanUnion, and BooleanDifference commands. The BooleanDifference and ArrayPolar commands were also used with spheres to create the notches at the top.

For this particular sleeve, I tried out a number of metal materials, finally settling on one that was somewhat battered and scratched, thus giving the flashlight sleeve a worn, used feel.

Ghosted
Layers
Render 1
Render 2

Roman Hunt: Week 4: Flashlight Sleeve 1

None of the flashlight sleeves I created for this week were driven by inspiration or deliberate artistic expression. Rather, they are the result of experimentation, of trying out the various techniques covered in the previous class and attempting to use them in various combinations to create forms that, if not necessarily meaningful or beautiful, are at least detailed enough to be visually interesting and of sufficient consistency to be aesthetically pleasing. For each sleeve, I used the BooleanUnion command to merge the various objects together, giving the sleeves a sense of being a single piece rather than an assembled conglomerate.

Most of the details in the sleeve are a result of editing a curve using the CurveBoolean command. A rectangle split down the middle vertically was used as a base, with various Polylines, circles, and other shapes used to create details. Once a single curve was created from these using the CurveBoolean command, its edges were softened via the Fillet command. After this, the Revolve command was used to create a 3D base for the sleeve. Finally, bumps and indents were created by using spheres in conjunction with the ArrayPolar, BooleanUnion, and BooleanDifference commands. The BooleanDifference and ArrayPolar commands were also used with cylinders and stretched spheres to create the holes along the middle and notches at the top, respectively.

For this particular sleeve, I tried out a number of glass materials, hoping to find one that was slightly transparent but still capable of allowing the various details to pop.


Ghosted
Layers
Render 1
Render 2

Tuesday, September 30, 2014

The-Phong "James" Pham: Project 2: Flashlight Sleeve

For my design I kept the cost in mind. So I wanted to think of ways to make it look interesting while taking away as much material as I could. With the flashlight project, light sabers from Star Wars came to mind, but I went with am astro droid inspired design with a clone/storm trooper scheme for the keyshot render.

The main technique I used was boolean difference. I would create objects and intersect them with the sleeve to get the shapes that I wanted to cut out of it.


Sunday, September 21, 2014

Andrew Kelly: Project 2: Flashlight Sleeve

Following are two views of my finished project, and the verification from shapeways:

Perspective view showing the front of the model
 Perspective view showing the back/side of the model

----------------------------------------------------------------------------
Week one progress
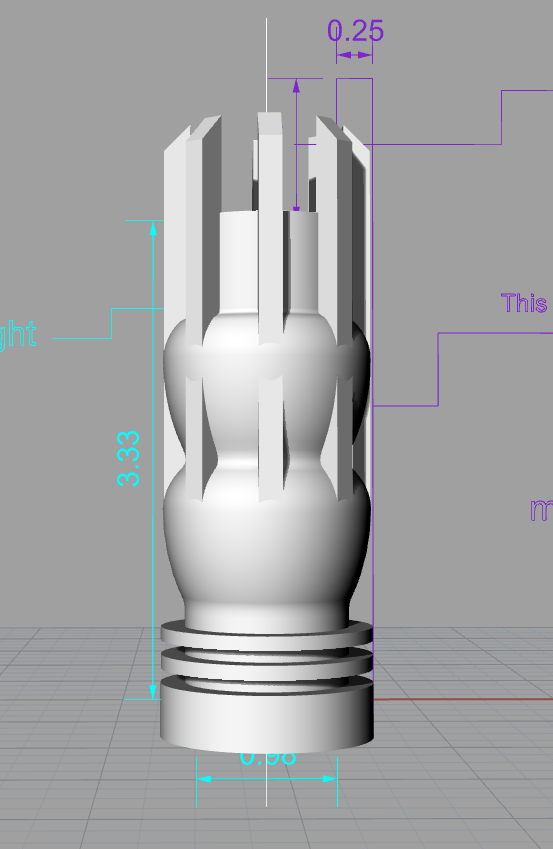
Here's my flashlight sleeve. I'm still getting a hang of rhino, experimenting with the different tools without any concrete final idea in mind. Input appreciated!
----------------------------------------------------------------------------
Thematic description
For this project I decided to see if I could carry elements of my previous project over to rhino, as a test of sorts for myself. I also wanted a flashlight sleeve that would be more of a light fixture than a portable utility, so I wasn't worried about comfort in hand or pocket, but I definitely wanted to be able to set the object on the table, turn it on, and be able to enjoy the shadow patterns. The pulsing center stock of the sleeve is a similar profile to the pulse on the loops of my first project, and the rods protruding from the top will hopefully cast strong shadows, so as to be visible even when the light is far from walls  or other objects. 
----------------------------------------------------------------------------
Two Rendered Views of each Model

----------------------------------------------------------------------------
Modeling Techniques
     For this project I utilized surface-based curve-modeling techniques in Rhino, using revolve, loft, sweep, booleans (union/subtraction) and lattice-deformers to make a pleasing model out of simple primitives.
----------------------------------------------------------------------------
Color-Coded Model

----------------------------------------------------------------------------
**Timing failure alert**
Look at those wonderful fluctuating expected/actual delivery dates. 

----------------------------------------------------------------------------
It arrived!

Nicolas Vallier Project 2: Flashlight Sleeve

Inspiration: 
My inspiration for this project comes from the same show. I decided to take some design cues from the sonic screwdriver and change it. 

To build it, I used the tutorial from eLearning to make it. I used a bunch of boolean differences and rotating tool.

Week 5: 
Here's my take on the flashlight case so far...

Week 6 Update:

Here is the updated version in...
Ghosted Black:
and...
Colored Layers:

Naked Edges Check:


Week 7 Update:


Project 2: Flashlight (Wireframe and Render Pics)

Week 7.5 Update:
Update:
I had to change a few things because the tutorial I had done to make this didn't mention any size requirements, so I redid the front a bit (cut part of it off) and cut a hole in the back of it.

Naked Edges Check Update:

Colored Layers Update:

Keyshot Renders:


ShapeWays:
The Flashlight has been sent to ShapeWays already. It passed everything and is being shipped at the moment.
Side note: In Rhino everything was right dimensions-wise (in inches) but once I realized that it was too big Shapeways started production and, due to their policy, I couldn't stop the printing. 
Update: I tried to reprint it at the UTD Tech Store, but their printer broke last Wednesday. It was fixe don Friday, and so, due to them not printing on weekends, I couldn't get the correct sized model for Monday. I will bring it ASAP though. (Also I still have my slightly over sized flashlight and will bring it to class.)