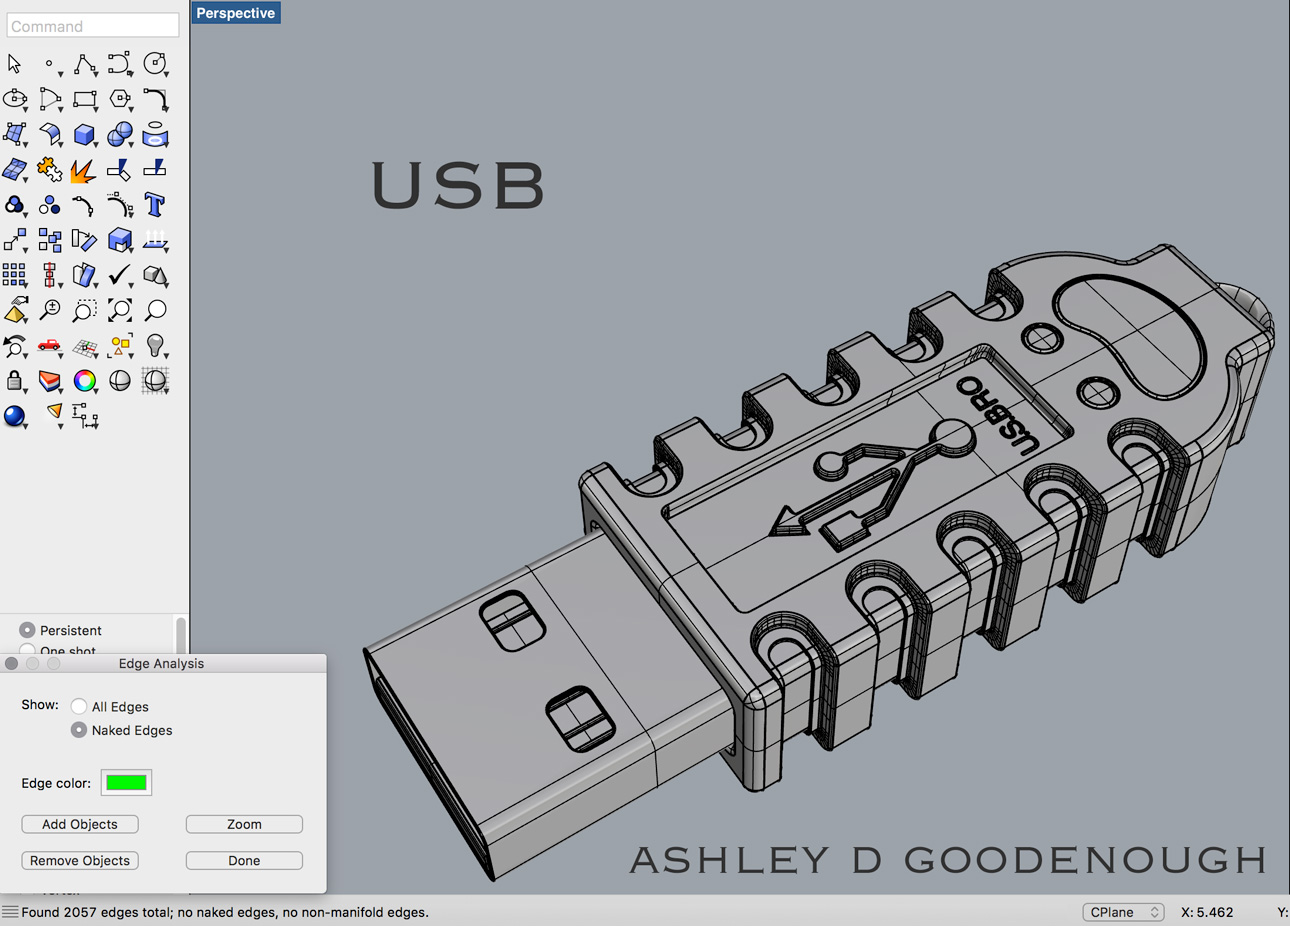
Showing posts with label usb. Show all posts

Monday, February 29, 2016

Travis Fowler: USB

Concept:

The USB connector is often one of the most over-looked aspects of any product, but just because it's over-looked doesn't mean it should look unappealing when looked over. The design for the USB came directly from the reference material. Variations between my model and the tutorial model come solely from a difference in extrusion distances.

Techniques:

Offset surfaces and project curves to surface were the two main stars of this show. The offset surface command is extremely powerful in that it can take open poly surfaces and very easily set them up to be closed shelled poly surfaces. The project command allows the modeler to create intricate cuts into an object. In this particular scenario, my intuition lead me towards using a series of Boolean unions and differences to create the main body but the head of the USB was best modeled with the offset surface command.

Material:

 The materials I chose were a matte black soft plastic for the body, something that most USB connectors have, aluminum port connection with gold prongs. The gold prongs were thrown into the design for the same reason I chose the copper in my hammer, matte metal looks good next to matte black plastic.


Saturday, February 20, 2016

Tara Intyrath: Week 4 - USB

Concept: I don't think USB's need to look crazy or anything like that cause all a person is gonna do is throw in their drawer or bag and that's all you'll see of it until it gets plugged into a computer. Even then you forget about it since you'll just be staring at contents of said USB. This is why for my USB I used the tutorials base image to make my USB. I did small minor details to make it different such as show how much data is on it and gave it a cap as well as a king ring.
Technique: I used all the techniques used in the tutorial for the majority of it but used boolean difference instead of trimming/splitting holes into some parts of the solid as I thought it was faster and easier. I used the FilletEdge command on almost every single edge finding that you really must be careful with the radius because if you end up overlapping too much you can end up with a lot of naked edges. I did have a lot of fun figuring out a lot of the curve tools to make the shapes I wanted such as the text command.
Materials: The materials I used here are very basic plastics and metals. I used a scratched up metal for the USB part though its very subtle as with persistent use USB's do tend to get a little beat up. The key ring is a very simple steel and the rest of the USB is a soft rubber plastic. In the second render I decided to make the cap a transparent plastic to see how the USB would look through it.


Monday, February 15, 2016

Victoria Mayfield: USB


Concept: When I began looking for other reference images for my USB I didn't really find any I liked more than the one that the tutorial referenced, so I decided to use that. I did find some USB drives that had lights on them so I wanted to find some way to incorporate that idea into my model. I eventually decided on adding an ornamental piece to the top of the USB that would shine an LED light through from the inside. I chose to change edges of the USB to be a little bit different than the ones pictured. I also decided that I did not want to have the actual USB symbol on the piece like the reference image does.

Modeling: To create the body of the USB I used the rectangle tool the arc tool. I was then able to create another smaller rectangle inside of the larger one in order to cut out the divots on each side. I used the project tool to project the shape of a rounded rectangle to get the original cutout for each divot. I then used the sweep 2 tool and the fillet tool in order to create smoothed cut outs in each side of the USB. This gave me some trouble when I began filleting the edges, some of them rails I made did not line up, and I didn't realize it until after I had already swept the rails. I was able to correct this by creating new rails, sweeping the edges, and filleting again. I then used an oval shape to ornament the top of the USB. 


Materials: For the materials I decided to stick with simple colors. I used a shiny blue plastic for the body of the USB because I liked the sheen and how clean it made the body look. For the oval LED ornament on top, I used a clear blue plastic as I wanted it to flow with the body of the USB. I also chose the clear blue color because I imagined a light would appear from within this ornament when the USB was in use. For the head of the USB, I used a shiny aluminum metal. I wanted this part of the model to also appear clean, and I believe these materials reflect that.  

Megan Heard: Week 4 USB


Concept: I followed the reference image mostly, but ended up making the outer bit an entice cover for the inner bit.


Technique: I ended up making the USB body two completely separate pieces, partially because I wanted to and partially because if I tried to fillet the edge as one piece it put holes in it. I used project, trim, extrude and offset mostly.


Materials: I wanted to make the outer piece like a protective sleeve to protect from dropping it. I chose the inner piece to be translucent because I think it would be neat, even though I have no idea what the inside of a USB looks like. I chose anodized metals and plastic for the plug bit and tried to simulate what my real-life USB looks like.

Christopher Rickett: Week 4 - USB


Concept: For this model I just wanted to do something fun.  So while it looks like a normal flash drive, it has a whimsical exterior because of the smiley face. And the key ring on the back end just rounds the whole thing out nicely.


Technique: To get this model, I used a lot of projected curves, curve extrusions and trimming to get the cuts along the edges of the drive. The smiley face was created with cylinders and extruded curves as solids and Boolean differences.  I used a text solid to create the lettering on the top of the drive.


Materials: The materials I chose are pretty basic. The main piece that makes up the outer shell is a hard plastic while the smile face and the lettering have a rubber material applied to them.  As for the rest of the drive, the materials are standard. Different metals and black hard plastic are applied to the end of the drive, and the ring is a hard plastic.

Alec McKay: Week 4 USB


Concept: I wanted to give my USB a cap because most of the USBs I’ve used have had some mechanism to cover the plug when it’s not in use. I wanted to model the cap such that it matched the main case for the USB. To do this, I made more cut-ins to make the cap look like it goes with the USB.


Modeling Techniques: To make the cut-ins on the sides, I made use of the two rail sweep tool to create a surface between the original surface and the floor of the cut-in. I also used a linear array to evenly space the cuts. The boolean difference tool created the hole in the cap for the USB.


Materials: The outside case for the USB is made out of black plastic, as most USBs are made of plastic. The plug that goes into the computer is made from a silver metal. The pins on the inside are different colors from the outside, so I made it a darker metal.

Jung Choi Week4 USB

I mostly stuck to the tutorial until the end. I could not think of what to make and was playing around with it and got the idea to make ears for the USB. Then it just turned into a Mickey Mouse type of USB for kids as many schools are starting to utilize more technology even for little kids in elementary school. I gave it ears, eyes, nose and a mouth and tried my best to make it look like Mickey, but I could not find the right colors in Keyshot.
Modeling techniques were mostly creating solid objects from curves using loft and using sweep and blend surface tools to create surfaces. I used boolean difference for the eyes, ears and the mouth. I mostly learned how to create holes and indentions on surfaces using projected curves and the blend surface tool. I use fillet edge tool to create rounded edges.
 The materials were all plastic except for the parts that are inserted into the socket which is metal. For the color scheme, I tried to get it close to Mickey with the black round ears and decided on the colors as he wears red pants and yellow shoes. I could not find a good skin color tone for the body so I just decided to go with yellow.

Sunday, February 14, 2016

Christopher Clark USB


 Concept- For this model, I decided to model my own USB flash drive that I wear on my key chain. I feel that the compact design and rounded corners reminiscent of the base of a key make this flash drive a portable simplistic device. I also wanted to ensure that the flash drive wouldn't appear cheap or filmsy, so I made sure that the base was just big enough to give the flash drive a fullness without being bulky.


Modeling Techniques- I used a bitmap to model the head of this flash drive with an image. I offset curves in order to give the head of the flash drive depth, creating to surfaces and lofting them together. I used a similar technique for the rounded rectangular holes in the head. I also used Extrude Curves a lot this assignment, giving certain things length and creating the base for larger pieces, like the casing, which is extruded from a filleted circle and rectangle. I also, of course, filleted the edges in order to create a sleeker, more rounded flash drive.


Materials- I used a rough black plastic for the casing so as to best match my actual flash drive while also contributing to the infered stabilty and durability of the flash drive. I used an aluminum texture for the head of the flash drive because it reflected the light in the best way to match a flash drive. I did, however, use a different more specular material on the inner pieces of the head in order to make them more noticable in their darker casing and match an actual flash drive more closely.


Charlotte Guzman-Russell Week 4: USB

 Concept: For this model, I wanted to make something cute and look similar to a lot of the cheap USBs you can easily pick up at a Walmart or on Amazon. Since frequently lose my USBs in my room or in my bag, I wanted to make the USB look a little bulky so it could be easily found among books or papers.
Technique: I used the project curve tool on the metal part of the USB to create even square holes on the bottom and top of the usb. I also used the boolean difference tool to cut out the face shape. I used the blend surface tool to attach the arms to the body of the USB.

Materials: I used a matte plastic material to give a sort of rubbery look and gave it an bright blue color so it could easily be found if lost. Next I made the metal part of the USB a rough silver material and the part within a white plastic material.


Monday, February 8, 2016

Ashley D Goodenough: USB

Concept: My USB was designed to be simple, useful, but cute. I thought it would be fun to give it a sort of personality, since USBs do so much to be useful to us. The design became anthropomorphized into the U.S.BRO. He’s got your back.
Modeling: Techniques used in Rhino for building the U.S.BRO started with using a bitmap background for referencing size, shape, and positioning to create my initial forms and curves. I also used arcs, curve extrusion, trim, offset, filletEdge, curve projection, sweep, loft, blendEdge, cap, boundingBox, etc. For combining particular parts into their respective sections for materials, I used split, explode, BooleanUnion (difference, 2Objects, etc.).
Materials: For the body of the USB and the logo details, I used hard rough plastic, since this is often what USB shells are made of for durability. For the inside metal details, I used zinc in two different shades to distinguish the strips from the rectangular shape.  For the metal insert, I used knurled titanium.