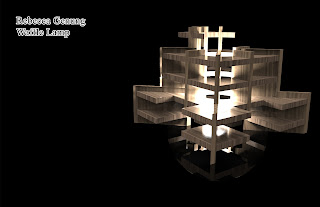
Showing posts with label waffle lamp. Show all posts

Monday, May 1, 2017

David Rake Week 12: Waffle Lava Lamp


Concept:
Growing up I always had lava lamps in my room, 4 or 5 at any given time. Now when I hear lamp that is almost always what my mind thinks of. If not its that one lamp that loomed over my father's reading chair. Regardless I thought a typical lava lamp would look cool.


Techniques:
I started by drawing the outer edges with the curve tool. I created 7 vertical columns using polar array and 4 horizontal planes. I extruded and capped the curves. I then used boolean tools to create the indents. I do not have the hole cut out for the actual light yet. I inverted the lava lamp design because the top of lava lamps are typically pointed or at least tapered. To create the aperture for the actual light would leave steep columns which didn't look particularly good.


Materials:
With Keyshot I chose a shiny blue plastic that looks close to my favorite lava lamp from my childhood. Upon building it I used cardboard and it was stronger than I originally thought it would be. For the light I used a small 7W Led bulb.


Thursday, April 13, 2017

Lauren Barbieri: week 12 Waffle lamp

concept
The exterior arms are supposed to be very organic and abstract. The interior form is supposed to be a kind of cage around the light source. The light hitting the upper points from below will hopefully create something like a candle flame effect. I wanted to have two levels of shade between the outside and the light source and really get the light to diffuse. 
technique
The original shape was made by warping control points on a sphere into the pointed shape and polar arraying to form 6 spines. In the center is a hollowed oval shape with a hole in the bottom where the lighting fixture will go. I then all Boolean un

ioned it all together.
Materials


Two different colors of wood on the exterior sections probably achieved through stains. The six spines are a darker tone and the horizontal segments are light to reflect more. the interior section is Plexiglass slightly orange toned. 
UPDATE: May 1, 2017

The pieces were laser cut and then stained before being joined together, I considered adding a gloss finish but ultimately decided that a more rustic look worked better.


Monday, April 10, 2017

Maizie Desmarais: Week 12 Waffle Lamp


Concept:

My waffle lamp was based off the shape of a normal lamp shade. I thought the dynamic shape in waffle form would really stand out while still being simplistic. Originally, I wanted to do a mushroom shape, but in the end I thought this worked out for the better.

Modeling Techniques:

It took roughly five different times for me to model this waffle lamp. I created the shape in Rhino with the rebuild tool on a sphere shape, then created a hole in the middle for the light to go in. I used contour and did every other inch to make sure I didn't have too many layers so it could fit on the wood sheet for laser cutting. Next I used intersection on the curves and piped them at .25 in (1/4) for my wood sheet sizing to fit. Afterwards I used the unroll script to layout each curve and extruded the edges by .125 on both size to make it .25 total for rendering.

Materials:

At first i thought plexiglass would look really cool for the light to shine, but in the end I chose wood because it's cheaper and I think it looks nicer. I also think it wood (ha get it?), it would look really cool with engraving/ laser cut designs on the wood for the light to shine through.


Rebecca Genung: Week 12 Waffle Lamp


I wanted to use only basic shapes this project. Inspired by cube-shaped statues and a oddly shaped building near where I live, I created a simple but modern design.

For technique, I just kept it simple. I placed cubes in the shape of the building I mentioned above and Boolean-difference a cylinder from the center to leave room for the light. The Rhino scripts provided glitched out on me so I did everything by hand.


For materials, I used oak in the KeyShot. In KeyShot, I made the vertical pieces beige to keep the textures from muddying the form. The actual lamp itself is made of .25 cardboard.

Saturday, April 8, 2017

Jason Doze Week 12: Waffle Lamp


 Model / Waffle

Printer Reference Layout


 Shot 1


 Shot2

 Fail 1


 Fail 2


Concept:  I wanted to create a circular model that was an ovoid that tapered vertically at the top.  After playing around with the model, I choose to have an opening in the lamp also to break both the vertical and horizontal planes.  I imagine having a translucent light shield covering the inside 4" cylinder housing the lamp that would direct the light up and out of the fixture as well as emitting light horizontally. 

Material:  The material I found suitable for this project was all plastic.  I chose clear plastic and blue transparent plastic to make the fixture as believable as possible.  In fabrication, I would choose acrylics and I think a polished aluminum cutout for the front radial "shard."  I used overtly expensive liquitex acid lime, and flat white paint.


Technique:  I made a curve that I like then revolved it and added a surface.  After scaling the model, I scaled out the width to make it oval.  I made a 4" cylinder and brought it near center of the model and then rotated it of center to create the light tunnel and front void of the model using boolean difference.  Next I used section and contour to find my horizontal and vertical curves, made the surfaces and used cut my ribs and massive unroll to layout the parts on the reference bed. 

Sunday, December 13, 2015

Brittany Jones: Waffle Lamp - "Comet"

Concept
As a school spirited UT Dallas graduate student, I wanted to incorporate the university's outer space theme into one of my projects. Since we're the "Comets" and comets emit light, I thought it would fit well with the waffle lamp project. I browsed Pinterest and Google images for comets and waffle lamps to become more familiar with the fabricated models out there. Then I drew a quick sketch.


Modeling Techniques
In Rhino, I combined a Nurbs sphere and a truncated cone to create the base shape. Then I copied the sphere and scaled it down inside the first sphere. I used the Boolean difference to carve out the center of the comet. For the comet trail, I used the cage editing tool to scale down the middle section of the cone to create a curve. After that I copied the cone shape and scaled it down inside the first cone. Then I used the Boolean difference to carve out the inside of the comet trail. For the notch details of the tail along the sides of the radial slices, I drew a handle curve and extruded it to create a poly surface. Then I modeled four cubes and a couple cylinders for the light bulb holder. I scaled one cylinder smaller than the other and used the Boolean difference to create a 1 inch hole. I copied the piece and moved it to the opposite side of the sphere to create two options for the light bulb placement.


For the contouring process I first contoured the Z axis. Then I created a bounding box and went to my top view to create a radial section for the X axis. After that I went through the process of cutting my ribs. The material thickness and cylinder thickness was 0.12. Then I used the massive unroll script to lay out my contours for slicing.


Materials
I used brown hardboard for the physical material of the Comet lamp. For the light bulb, I chose to get a flickering orange flame to emulate the fire of a comet. Due to the optional light bulb placements and form, the lamp can also be hung upside down.


Monday, April 13, 2015

Tanner Mortenson Week 12: Geometric Lamp

For week 12, I continued to build on the idea for my geometric lamp.
After last week, I had finalized my idea and began to get the design ready for Laser Cutting.
Once the design was finalized, I used two helpful scripts within Rhino- "Cut My Ribs" and "Massive Unroll". Cut My Ribs allowed me to select the different oriented pieces, and then allow the program to automatically cut slots into each piece upon their intersection.  Next, Massive Unroll allowed each of those individual cut pieces to be laid out cleanly so I could then arrange them on my cutting sheet.

I chose to use a 30x36 sheet of plexiglass to make my lamp out of, purchased from Home Depot.
In addition, I had to get another small piece of plexiglass to account for the excess pieces that were unable to fit on just one sheet.  

I decided to choose the thinner plexiglass sheets to reduce the overall weight of the lamp. Looking back, I would have loved to know silicone was not the best adhesive for this project, as it turned greasy and was not clear as I had hoped it would be.  It was also very flexible still when dry, so the structure of the lamp was very shifty.
The light was placed in the middle of the upper portion of the lamp, allowing light to not only be projected left to right and out of the top, but also downward in an ambient fashion.
This unique direction of light is one of the reasons I chose this design.

Rhino model screenshots:


Laser Cut sheet design and layout:

Keyshot Renderings:


Final Product:


Light on: 


At rest on a stool.


Saturday, December 13, 2014

Kristine Dickson: Week 11 Radial Waffle Lamp

The lamp I had in mind would be something that covered the top of a post, like on railing or a balustrade. I wanted it to be rounded on top and taper in a bit around the lower half.

Reference Photos:


When I was modeling it, I tried using the a lathe tool in 3ds Max to create the entire thing using splines, but I could not get the the shape that I wanted out of it. Instead, I ended up joining half a sphere to a cylinder and squeezing the middle of the cylinder in to give it the curvature I wanted. I then pulled the top part of the cylinder out a little bit so the hemisphere was nested in it.


Ghosted Images:


Keyshot Images:


In Keyshot, I chose to use the Mahogany wood texture, with a couple slices in 24k Gold. I liked how the light inside brightened the wood texture on the inside; it contrasted nicely with the dark wood texture around the outside. I chose the gold material for the middle ring and the top ring to mimic gold trimming if the model were solid and not a waffle structure. It also brought a little variety to the lamp.

Sunday, November 16, 2014

Chris Venable - Waffle Lamp

While fleshing out the design of my lamp I began browsing through the project history provided on Blackboard. I found that I really liked the more elongated look of some of the designs and thought that I would incorporate this same aesthetic into mine.

My lamp began life in 3Ds Max, I am quite familiar with Max and wanted to take advantage of the spline editing features available in the program. After creating a silhouette I used the Lathe modifier to rotate the object around an axis, this created the polygonal geometry displayed below.

While designing the lamp I really wanted to play with the idea of sharp vs subtle curves while incorporating heavy tapering. The ends of the lamp feature a soft, gradual curvature while the center is dominated by a sharp peak.


My lamp is created used .24in MDF, I really like the character that the laser adds to this material.