Showing posts with label 2k15. Show all posts

Sunday, May 10, 2015

Renae Patoskie Week 11: Lamp

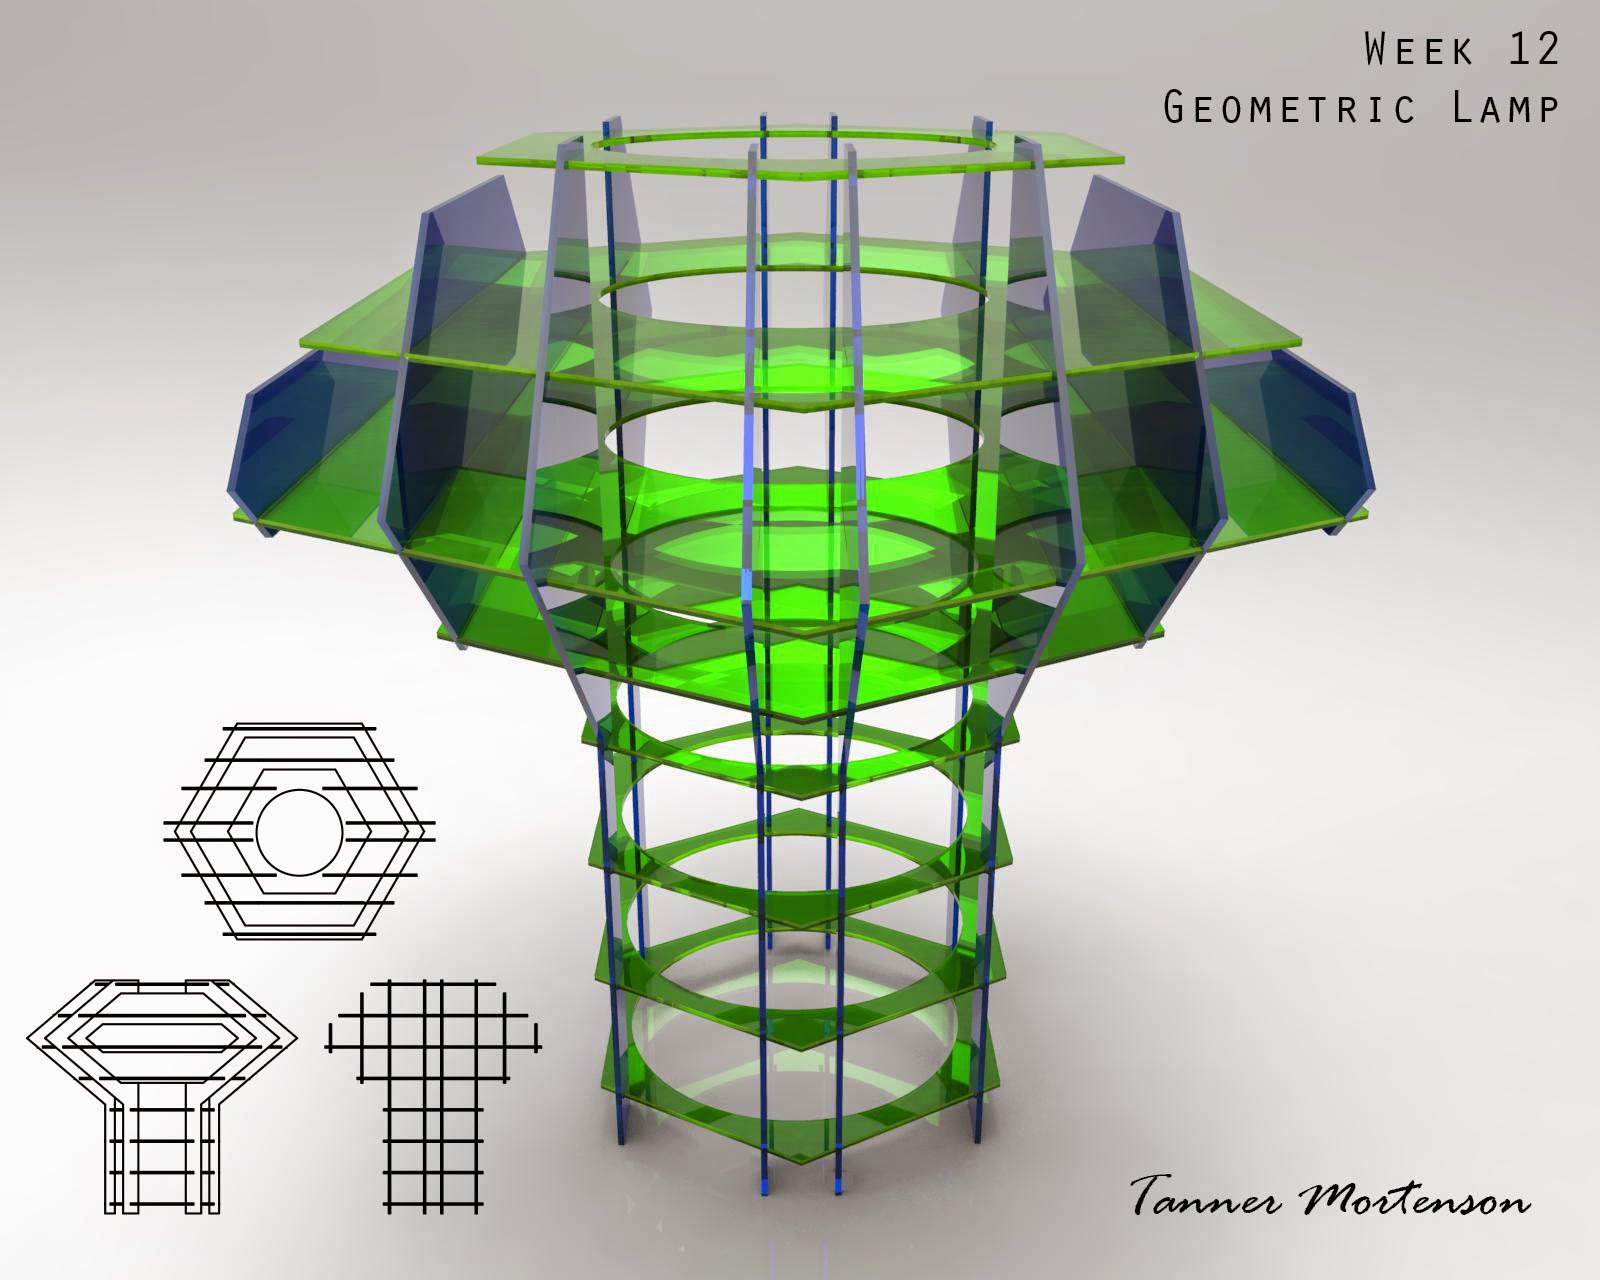
In most of the examples for the Architectonic Lamp project, a shape was used to create the lattice structure. I wanted to use multiple forms to create something more active and engaging. 

To create the model I drew separate outline curves for the two different layers. I then revolved them, and took a single section slice which I then used the polar array to equidistance my slates around the form. I repeated this concept with the other shape. I then found the innermost points of each object and inserted circular planes to hold the outer shapes together, careful to leave ample room for a spherical lightbulb.

After using the CutMyRibs script to create my slots, there were a lot of overhangs, to simplify the clean-up process, I simply corrected a single outline of each form and then duplicated each 7 times to get my outer shapes.

Rhino rendering of final model.


I tried to save material and time by printing both my box and lamp on the same sheet.


Lamp rendered in red and yellow plexiglass


Lamp from above with simulated emissive light, for the interior places I used clear plexiglass.


Constructed Lamp.

Renae Patoskie Week 12: Box

For the geometric unfolding I chose to make a candle holder. With the intention of giving it to a Disney enthusiast I chose to incorporate symbols from her favorite films.

The Sun Motif from Tangled, Tiger to resemble Raja from Aladdin


A Rose to signify Beauty and the Beast and a Conch shell for the Little Mermaid

Each side was dedicated to a single movie so that it could be rotated at the viewers discretion. I imported the images into Illustrator, obtained curves from the images and then imported them into Rhino where I cleaned them up to create appropriate outlines. 


Box and lamp combined cut sheet.

During cutting it became apparent that many of the lines in both the Tiger and Rose images were too near one another, and the intensity of the laser burned the outlines to a crisp. These panels were therefore engraved instead of using inside cuts lines.

Assembled Box: Shell and Rose / Tiger and Suns

Renae Patoskie Week 10: Waffle Structure


For the Waffle Structure project I again wanted to create a visual texture. To accomplish this I started by creating a curved form using the Loft command. I then created the interior shelf using the extrusion of a cylinder and Boolean Difference.

Once I had contoured the object in 1in. sections I selected a gradient traveling in the vertical and a pulse gradient in the horizontal for the final waffle. This design choice creates interest while also providing support to the sections of the shelf likely to experience more weight. I then altered the contour of the interior shelf to mirror that top surface edge giving the shelf a more completed look, while also increasing the functionality of that lower shelf.

Rhino Ghosted Image of Shelf
Rendering of Shelf in two tones of Wood.

Assembled Shelf.


Sunday, April 26, 2015

Renae Patoskie Week 8: Serial Slices

For the Serial Slices project I was inspired by the texture possibilities.


This technique has been used to create ambiguous, resemble contour mapping, or simply visual textures. I wanted to apply this visual texture into a common place object.


My goal was to create a similar texture to the one featured in the figure on the left, while creating a visually pleasing bowl inspired by the figure on the right.


To create this model, I created a series of 6 curves using the sketch tool. I then aligned the three surface points so that the bowl would be sufficiently balanced. I then lofted between the curves to create the outside surface. I then duplicated the surface, offset it above the outside surface and then sheared off the excess to create a flat edge on the top using the trim tool. I then used sweep two rails to create a surface between the inner and outer surfaces.


Due to the non-uniform thin outlines, it took 3 sheets of 24"x 48" mdf to print this project.


Constructed bowl from the end.


Constructed Bowl from above


Monday, April 13, 2015

Tanner Mortenson Week 12: Geometric Lamp

For week 12, I continued to build on the idea for my geometric lamp.
After last week, I had finalized my idea and began to get the design ready for Laser Cutting.
Once the design was finalized, I used two helpful scripts within Rhino- "Cut My Ribs" and "Massive Unroll". Cut My Ribs allowed me to select the different oriented pieces, and then allow the program to automatically cut slots into each piece upon their intersection.  Next, Massive Unroll allowed each of those individual cut pieces to be laid out cleanly so I could then arrange them on my cutting sheet.

I chose to use a 30x36 sheet of plexiglass to make my lamp out of, purchased from Home Depot.
In addition, I had to get another small piece of plexiglass to account for the excess pieces that were unable to fit on just one sheet.  

I decided to choose the thinner plexiglass sheets to reduce the overall weight of the lamp. Looking back, I would have loved to know silicone was not the best adhesive for this project, as it turned greasy and was not clear as I had hoped it would be.  It was also very flexible still when dry, so the structure of the lamp was very shifty.
The light was placed in the middle of the upper portion of the lamp, allowing light to not only be projected left to right and out of the top, but also downward in an ambient fashion.
This unique direction of light is one of the reasons I chose this design.

Rhino model screenshots:


Laser Cut sheet design and layout:

Keyshot Renderings:


Final Product:


Light on: 


At rest on a stool.


Sunday, March 1, 2015

Renae Patoskie Week 7: Slots

Following my 3D Printing Free Model project I wanted to continue exploring the Fibonacci Sequence, but with a more organic shape. To minimize rough edges I therefore only allowed my modular form a single slot that would not be visible once attached to the whole. My modular forms were designed with the intention of building outwards from the center piece in order to maintain clean outer lines.

I created my forms by deforming a circle into a petal or leaf-like form, to enhance the Fibonacci visual. On the basic form there are two difference slot placements, to add variety in the constructed design's capabilities. With the intent of using both the Fibonacci numbers 5, 8 and 13, I printed each part in those multiples with a few spares. This is also why my central shape is a octagon.

Illustrator outline of modular forms, with inner and outer cuts designated.

As I assembled each configuration, I could never settle for just one; similarly each assembly grew farther and farther from any likeness to Fibonacci. As the complexity of the design grew they did however become unstable due to the lack of intersecting slots. However I much prefer the versatility this left me open to, and should a true favorite present itself, there is always glue.

Design 1: Perspective View

Design 1: Arial View


Renae Patoskie Week 5: FreeModel Inspiration

For the 3D printed Free Model I wanted to create something classic and complex. So I have decided to explore the Fibonacci Sequence. Originally I was inspired by the work of John Edmark. 
Fibonacci Zoetrope Sculpture designed and 3D printed by John Edmark.

Originally I pursued creating a conch shell:

Ghosted Rhino Visual.

Keyshot Rendering of Conch Shell.

 but upon further difficulty transferred my endeavor to look into the intersecting spirals found in pine cones, artichokes, sunflowers, succulents etc. that also follow the Fibonacci Sequence.
 Image result for pine cone fibonacci
Examples of Fibonnaci Sequence in Nature.
http://www.ecotree.net/fall_2011.shtml
https://lh4.ggpht.com/5YRvUhfiHxmw4WEzYYP2LeaDfnu6s_i1vmNLCgngFVNIVfo3FpQaYRTJow4GdVA1RMM23U0=s125
http://www.goldennumber.net/spirals/
http://www.zyq108.com/blog/6063

For my final model I used basic modeling techniques, free creation of a curve, UV curve projection, ribbon curve, extrude, array, and boolean union and boolean difference to create this model.

Ghosted model with zero naked edges.

Layer organization in Rhino.

When it came time to render my model, I was conflicted between simple two tones of wood, or something that would emphasize how the spirals contrast more than just the geometry of the design.
Below I used a dark walnut for the orb, glass for the counterclockwise spirals, and emissive light for the clockwise spirals. This could likewise be accomplished with the use of fiber optics.

 Rendered view 1.

Rendered view 2.

Final printed model.