Showing posts with label 3d. Show all posts

Saturday, January 28, 2017

Brandon Wehenkel: Castle


Ghosted Black


Ghosted Colored


Concept:
I have a lot of fun doing architecture.  I got all my inspiration from playing The Sims for 17 years.  But this program is nothing compared to the building tools in that game so it's more of a challenge here.   I really liked Jay Gibson's castle from another school.  Last time I wanted to create a house on a cliff, but I had no idea how.  After I had done some minor studying of Mr. Gibson's work, I learned how.  Also, I'm quite fascinated with old architecture, and I did one of my favorite styles (Modern) last time, so I wanted to attempt another this time around (Roman).  Gothic would be fun someday, but all that detail would ruin me.  I still need practice before then.  Anyways, I like the idea of buildings dangling off a cliff or built into the cliffside, so that's what my theme is here (again).   This was my inspiration image for a cliff.  It's cool that those cliffs have water below. Also, it happens to have a beach, so that's a huge win too!


Keyshot 1


 Keyshot 2


Modeling Techniques:
I needed to know how to make some Roman architecture, so I looked a bunch of images on google.  There weren't too many that I focused on.  I did find a good tutorial on digital tutors that used this image to make columns. I watched 16 out of 27 tutorials on how to do that, so I spent a stupidly long time with this model.  Everything I learned in the tutorials I did with this model.   I remember move, scale 1D, scale, sweep1, sweep2, Array, ArrayCRV, Revolve, FilletEdge, FlowAlongSRF, BlendSRF, BooleanIntersect, BooleanDifference, BooleanUnion, BooleanSplit, What, Cap, Project, ProjectToCPlane, setPT, insertEditPoint, explode, group, join, ExtendSRF, ExtractSRF, polyline, controlpointcurve, arc, 3pt Rectangle, 3pt Circle, Ellipse, editPoint, Point on/off, trim, zoomwindow, pictureframe.

The best way to explain how I used a majority of these were creating an object from curves.  Using revolve or arrayCRV, either exploding it and manipulating the control-points or I extruded the surface.  I used curves, angle and sweep1/2, pipe, setPT, and BooleanDifference for most of the column stuff.  I spent a majority of mine time Extruding, moving, and changing control points.


Roman Column Reference


Keyshot Detail of Columns


Materials:
There were a lot of materials.  All the dark grey colored materials were used for details: The railing.  The windows.  The door frames.  The unique wall decoration on the right long corridor (in the ghosted colored image those are the pink colored objects)
The floor of the main building was the more yellowish grey on the 2nd row down middle  The marble Tan to the right of that are the doors.  The 4th row, 1st material is the color of the columns.  The human skin in the top row center is the sand.  And the one to the right of that is the water.

Materials


Keyshot 3


Keyshot 4


Monday, December 5, 2016

Draven Ashorn-Hejl: 3D Scan Project - Isabelle Statue


Concept: In the game Animal Crossing: New Leaf, the player becomes the new Mayor of whatever town they move to, and to aid them in their mayoral duties comes the obscenely-hard-working-and-ever-peppy-yet-sleeps-2-hours-every-night secretary Isabelle. However, despite all she does for you, she never gets any real reward outside of occasionally being given a day off if you know how. I feel like it's time to change that, so I wanted to give her a nice sturdy statue that could be put in town to celebrate all her hard work.


Techniques: I followed standard procedure to create this 3D scan. I scanned the chosen object with the NextEngine scanner and ScanStudio software and tediously aligned the alignment pins (while learning there's a limit of nine pins) to ensure the best alignment I could. I then moved the scan into RapidWorks to fuse all the meshes and did some cleaning to get rid of the bumps caused by my alignment paint dots and added some general smoothing to ease the remaining general roughness. I lastly put the model into Keyshot and created the final renders.


Materials: For my scanned object I used an Isabelle Amiibo which was scanned by the lab's NextEngine Scanner. For the Keyshot material I used Pink Granite, a material sturdy enough to match the perpetual-motion secretary herself but in a nice cute color and a slight shine to it to match the adorkably cute secretary and her shining personality. For the real-world backdrop, I used a shot of the yard outside my dorm, as for some reason it has a lawn ornament on one side but not the other, so I decided to place my scan on the blank side of the lawn as it seemed only fitting to do.

Sunday, December 4, 2016

Brandon Wehenkel: 3D Scanned Object


  Final Concept & Design

 Work Station

Concept:
I've been wanting to do this project the entire time I've been at this school.  My goal is to buy a scanner to manipulate my sculptures in a more detailed digital fashion.  My design was to recreate one of my drawings into a sculpture.  I made a character when I was in ARTS 1201 (Drawing Fundamentals) at my previous school.  I'm quite fascinated with primates and anthropomorphism.  So I used my original drawing and the original picture as an inspiration to make my sculpture.

This is Bubbah he is my character, he's based off of the Common Chimpanzee or Pan Troglodyte species. He is currently a newborn shapen into my mind. Bubbah is a kind and intelligent half-breed. He didn't transform into how he is. He was merely born half man half Chimpanzee.


Modeling Techniques:
I started off with, I believe 12 gauge wire, no bigger than a coat hangar, and created a helix with a drill to build strength.  I just made a circle for the base and a 4x twisted spine.  I forgot to photograph it.  But trust me there's metal inside.

I bought about $100 worth of polymer clay of grey, black, and fair skin color.  I saw tutorials in the past to mix the black with other colors to make the clay softer.  It works but not as much as I wanted it to.  I ended up with about 10 lbs of clay into one gigantic marbleized clay block.  I ran into quite a bit of trouble mixing the clay together to make the shade I have now.  I bought an electric pasta maker to aid in my battle and it broke after 10 minutes of work.  I got my money back.  Next, I tried a meat grinder.  This lasted me 2 weeks.  The handle broke from excessive heat build up in the working process.  Because that crap was made out of cast aluminum I bought a cast iron one instead which you can see in the Work Station photo.  This worked a lot better to an extent.  I had to go and buy some clay softener liquid to use the machine more efficiently.  But I found out that it was much quicker to do everything by hand after I spent more time screwing around with machines.


Tools
None of the tools I use are meant for clay but I've repurposed them for my work.  I've got 2 crochet needles, 4 dental needles, a jeweler's flat head screwdriver & hammer, pliers, a spoon, an unsharpened knife, an eyedropper, and a plastic rolling pin.

Because the clay was such a disaster to work with I managed to smash it with the jewlers hammer when it was very hard to save my hands, thats when the rolling pin worked its magic as well. I asked around and learned that a hair dryer works too. Also the most efficient way is to heat up water and placing the clay into a plastic bag while it sits in the water for about 30 seconds. When I was able to get the clay into a swirled mess I put it inside the meat grinder.  That only worked for about as much as two handfuls of clay.  I gave up on the meat grinder after wasting about 4 hours cranking it to no avail.  Once I had about 30 balls of clay I started putting it on the armature and making the sculpture.


  Reference Images & WIP

 Facial Detailing
I was using a magnifying glass mounted to the table with some dental tools to remove all the burs that were left behind, left picture.  Right picture shows less burrs.  Burrs are the little pieces of clay that clump up when you slide a piece of metal into it kinda like how cheese curds.


  Ditched Design Idea
I originally had him planned as a bust design inspired by Gian L. Bernini, but I ditched the idea because the object was getting too tall. I would need to chop the bottom off and that would get in the way of the armature (also seen a part of my armature already cut, which came from the neck). Bad design on my part.  Next time I'll just make a thinner spine armature and not worry about making a wire base.


Materials:
Polymer Clay, Polymer Clay softener, 16 gauge galvanized steel wire, various tools I mentioned above,  NextEngine, ScanStuido, Rapidworks, Mudbox, Photoshop


 Scan Stuido Align Process


Next Engine 6.3M poly reduction to 900k

 Mudbox (Colored)


I ran into a problem where I couldn't get the paint effect to export to any other program.  Never used this program so its probably some very simple solution.  But I tried importaing as .obj to Keyshot, Maya, 3DSMax.  So here is an unrendered colored version of how my character looks in Mudbox.  The lighting is also quite wasky in mudbox.  I wasn't completely sure how to change them.  Their default presets were pretty awful.


Mudbox

Keyshot


Keyshot


Keyshot


Saturday, September 26, 2015

Victoria Tran: Week 4 - Baby Zergling 3D Print Model


  • Description: The model is a mash up between Kog'maw from League of Legends and the zergling from Carbot Animations. I was inspired by Jonathan Burton's (@CarbotAnimation) simplified version of a zergling in his Star Crafts animation. However, to give more ferocity to the character, I shaped the model with Riot's newest figure of Kog'maw in mind.  
  • Modeling technique(s): I started with a sphere, rebuilt it with at least 30 point counts, turned points on, then continuously pulled points around until I get the shape I wanted. For the eyes, wings and spikes of the tail, I utilized mirror while keeping osnap on to get a symmetrical positioning. The color separation of the fangs and the inside of the bottom mouth were created with a free-form curve and a split command. 
  • Choice(s) made in Keyshot: All of the materials, other than the eyes, are plastic rough or soft coloring. I chose a purple body to match with the coloring of Burton's zergling. But to have this "baby" zergling stand out more, I chose the eyes to be metallic blue instead of black. The plastic look helps me envision what it will look like as a mass produced miniature figure.  

Sunday, May 10, 2015

Renae Patoskie Week 11: Lamp

In most of the examples for the Architectonic Lamp project, a shape was used to create the lattice structure. I wanted to use multiple forms to create something more active and engaging. 

To create the model I drew separate outline curves for the two different layers. I then revolved them, and took a single section slice which I then used the polar array to equidistance my slates around the form. I repeated this concept with the other shape. I then found the innermost points of each object and inserted circular planes to hold the outer shapes together, careful to leave ample room for a spherical lightbulb.

After using the CutMyRibs script to create my slots, there were a lot of overhangs, to simplify the clean-up process, I simply corrected a single outline of each form and then duplicated each 7 times to get my outer shapes.

Rhino rendering of final model.


I tried to save material and time by printing both my box and lamp on the same sheet.


Lamp rendered in red and yellow plexiglass


Lamp from above with simulated emissive light, for the interior places I used clear plexiglass.


Constructed Lamp.

Renae Patoskie Week 10: Waffle Structure


For the Waffle Structure project I again wanted to create a visual texture. To accomplish this I started by creating a curved form using the Loft command. I then created the interior shelf using the extrusion of a cylinder and Boolean Difference.

Once I had contoured the object in 1in. sections I selected a gradient traveling in the vertical and a pulse gradient in the horizontal for the final waffle. This design choice creates interest while also providing support to the sections of the shelf likely to experience more weight. I then altered the contour of the interior shelf to mirror that top surface edge giving the shelf a more completed look, while also increasing the functionality of that lower shelf.

Rhino Ghosted Image of Shelf
Rendering of Shelf in two tones of Wood.

Assembled Shelf.


Monday, April 20, 2015

Jenna Bastian: Week 12 Fox Box

For this project, I used the BoxMaker generator to create a box template with dimensions 23 x 6 x 9 inches. The box is sized so I can store my manga in it. I made the height a bit taller for the ones that are sized differently (Dragon Ball and Star Wars manga). I decided to do an elegant, wind theme with a fox. 

I used the BoxMaker to create the sides of the box. I then went into Adobe Photoshop and used the pen tool to create the swirls and fox shapes, and exported those paths as an Adobe Illustrator file. Then I imported those into Rhino 3D. The blue parts will be cut out, and the red will be engraved onto the 1-ply cardboard. For the cover, I made a slot so I can fit and use a "key" made for the box to open it more easily. 

Assembling the fox box was quite simple. I applied super glue to the slots and fit it quickly to the other edges. I left the top lid unglued and fit the "handle" inside the middle. This will probably hold objects of low weight so the bottom won't fall off. I'm probably going to glue the cut out fox on the back of the box. 

Fox Box Template in Rhino3D

Fox Box complete #1

Fox Box complete #2

Fox Box complete #3


Monday, April 13, 2015

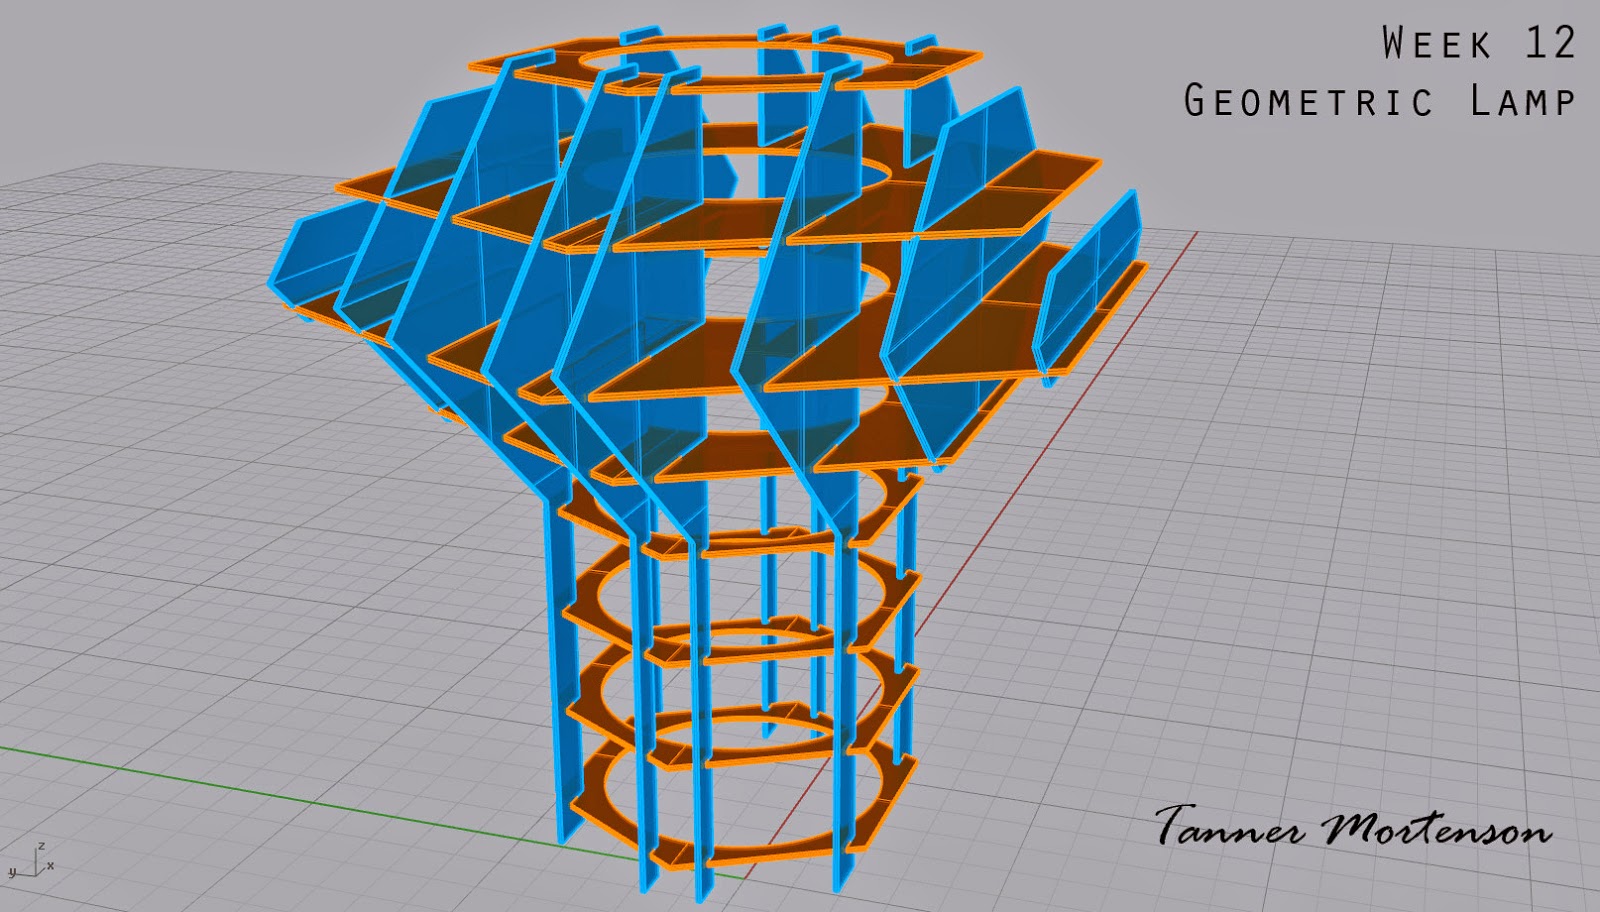
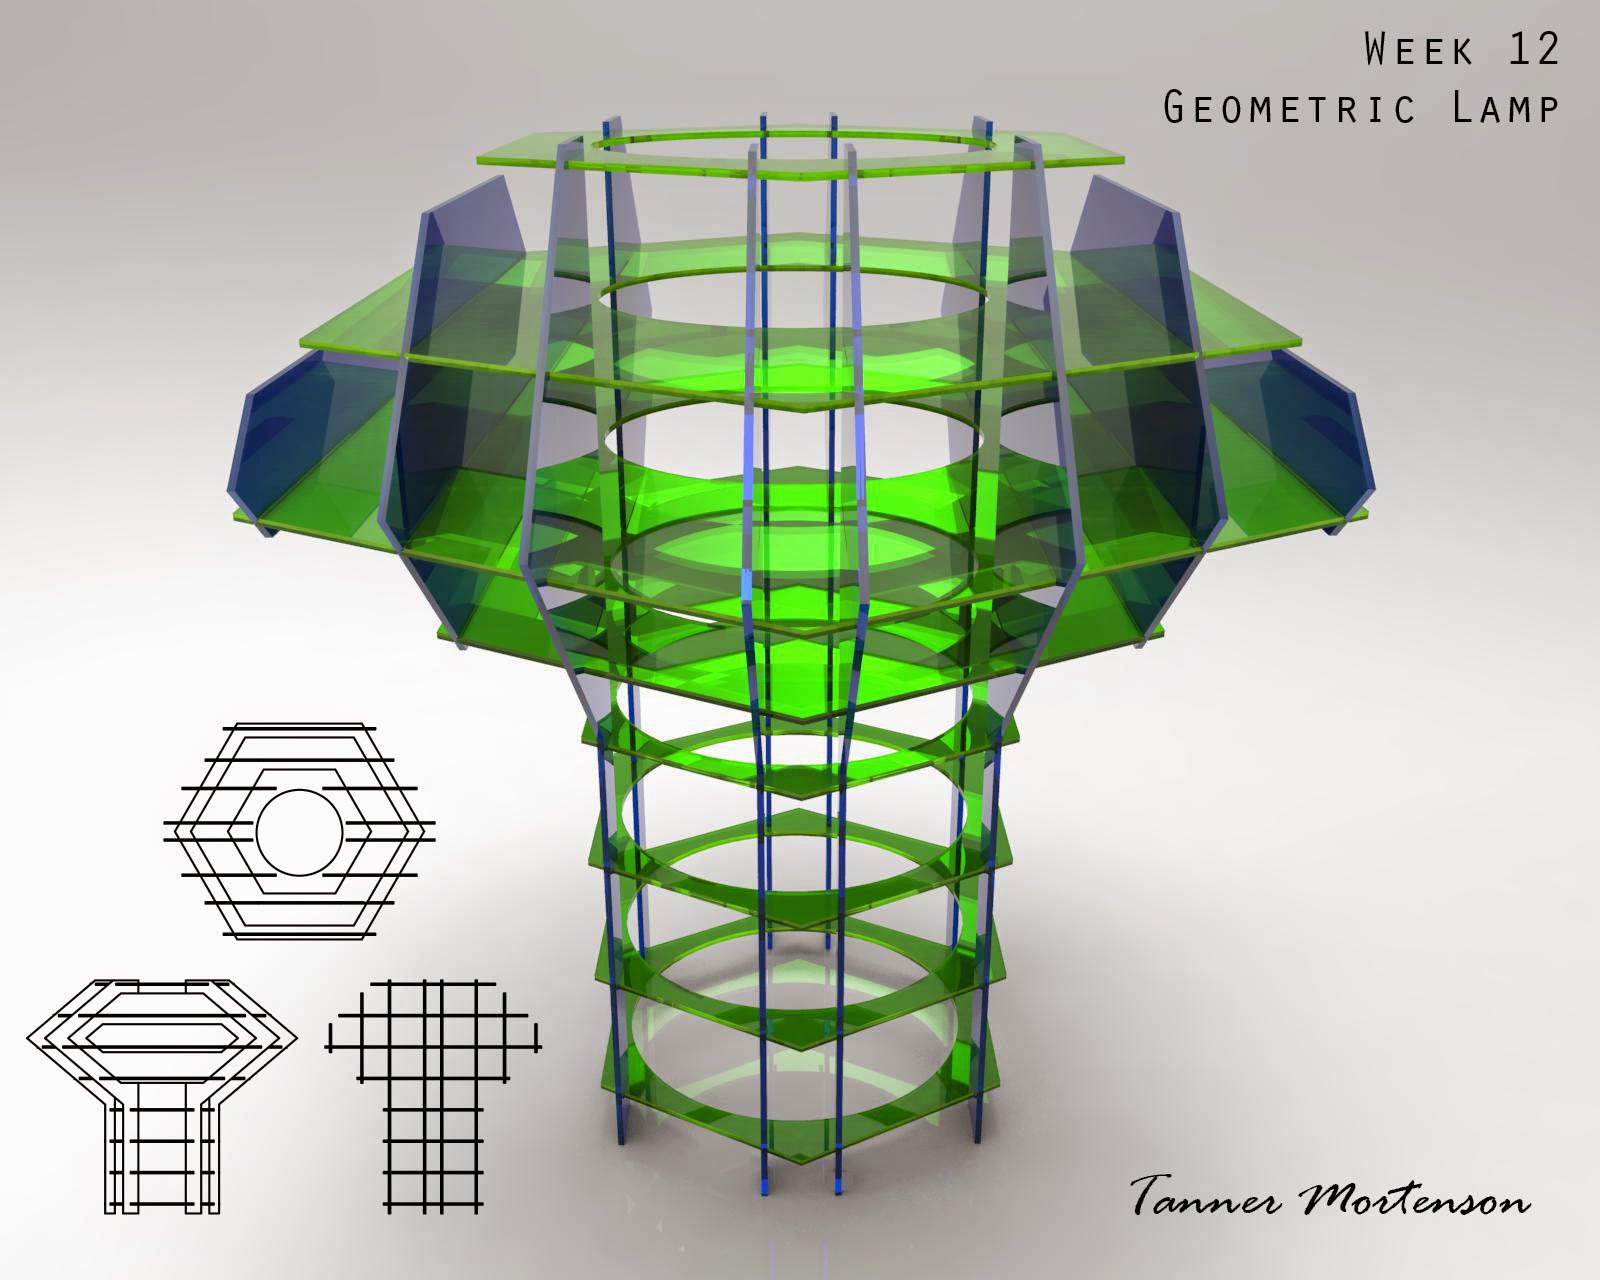
Tanner Mortenson Week 12: Geometric Lamp

For week 12, I continued to build on the idea for my geometric lamp.
After last week, I had finalized my idea and began to get the design ready for Laser Cutting.
Once the design was finalized, I used two helpful scripts within Rhino- "Cut My Ribs" and "Massive Unroll". Cut My Ribs allowed me to select the different oriented pieces, and then allow the program to automatically cut slots into each piece upon their intersection.  Next, Massive Unroll allowed each of those individual cut pieces to be laid out cleanly so I could then arrange them on my cutting sheet.

I chose to use a 30x36 sheet of plexiglass to make my lamp out of, purchased from Home Depot.
In addition, I had to get another small piece of plexiglass to account for the excess pieces that were unable to fit on just one sheet.  

I decided to choose the thinner plexiglass sheets to reduce the overall weight of the lamp. Looking back, I would have loved to know silicone was not the best adhesive for this project, as it turned greasy and was not clear as I had hoped it would be.  It was also very flexible still when dry, so the structure of the lamp was very shifty.
The light was placed in the middle of the upper portion of the lamp, allowing light to not only be projected left to right and out of the top, but also downward in an ambient fashion.
This unique direction of light is one of the reasons I chose this design.

Rhino model screenshots:


Laser Cut sheet design and layout:

Keyshot Renderings:


Final Product:


Light on: 


At rest on a stool.