
Concept:
I was extremely excited for this project because I had never 3D printed anything, or designed anything to be 3D printed before. I really wanted to take advantage of everything that a 3D printer could do and create something that wouldn't normally be possible using the traditional fabrication techniques at my disposal.
I changed major aspects of my design several times until I was happy with the results. However, the idea for my original version was inspired by several photos of gears, and a 3D printed watch band (with the clasp design inspired by a different bracelet). From there, I decided to simplify things and include a ribbon instead of printed watch links (they would be likely to brake/fail at the small scale that I originally wanted). I researched a lot about how gears physically work (its not as simple as one may think). Finally, I was inspired to increase the scale of the piece from a dainty bracelet to a larger choker necklace, mostly because I got a 3D printer and I could actually print it multiple times at different size variations to test out what worked best.
Techniques:
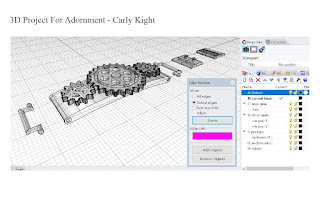
[Note for Professor Marder- It’s hard to read the annotations on the image that I posted here (because of the resolution specified in the Blog Post Guidelines page), but if you look at my Inspiration Submission on eLearning it should be legible.]
fter researching the physics of gears, I put the image of my two customized gears into Rhino as a reference layer, so that I could trace one of the gear teeth from each with a Polyline. I made a circle and then I used the ArrayCrv command to replicate my gear tooth all around the circle. I Joined the curves from all the teeth and Extruded the closed planar curve to the thickness that I wanted. I made evenly spaced cylinders (using ArrayCrv) and Boolean differenced them out of the solid gear shape. I used the Fillet command to round the edges of the gears. For the curved base, I made a Control Point Curve and Offset it to make a closed curve that I could extrude. Next, I placed the large gear on the center of the curved base and oriented the small gear perpendicular to the curve of the base. (This description covers most of the major commands I used, but it doesn’t cover everything obviously.)
Materials:
When I first saw my PLA 3D print, the layers stood
out to me as having an almost woodgrain-like texture to them, especially in the
pegs on the curved base. This inspired me to paint the curved base with alcohol
ink paints to look like actual wood. I chose to make the gears and clasps a metallic
silver (gold or copper wouldn’t have contrasted as well with the “wooden” base).
I sanded them down to get a smoother look, and painted them black, so that the
silver painted overtop of it would look more weathered and tarnished. I made
sure to only paint silver on the high points of the gears, i.e., not in the holes
or in the crevices between the teeth. Next, I wanted to finish the look and
make it all more steampunk-ish by using a dark red velvet ribbon to connect the
base to the clasps. The ribbon was way too wide, so I had to cut it thinner and
then fold it in on the inside to have clean edges (and have added comfort for
the wearer).
As for Keyshot, I tried my best to recreate all
of the materials and textures of my physical piece. I used a wood material for
the base, a worn metal for the gears and clasps, and a red velvet material for
the ribbon. I chose to move the position of the lighting between each of the
renders to show off each angle’s strong suit. For the render of the necklace
being worn, I chose a photo of a model with short hair and a visible neck, so
that the necklace wouldn’t be overlapping anything. I zoomed in and cropped it to
be a close-up of her neck, so that the necklace would be the focal point of the
render.


No comments:
Post a Comment